Gmail 101: How to Send & Receive Money with Android's Default Email App
Since its debut in 2004, Gmail has become the go-to email service for the internet at large. Over 1.2 billion people use it, so Google has wisely continued to add features that address the needs and wants of its diverse user base. For US and UK users, one of these new features is the ability to transfer money.Gmail lets you send or request money using Google Wallet. The desktop version has had this feature for a while, and the Android app recently added this functionality. With a few touches, you can send money to anyone along as they are located within the United States (if you are located in the US) or in the UK (if you located in the UK). There are no fees whatsoever, so there's no excuse not to try it!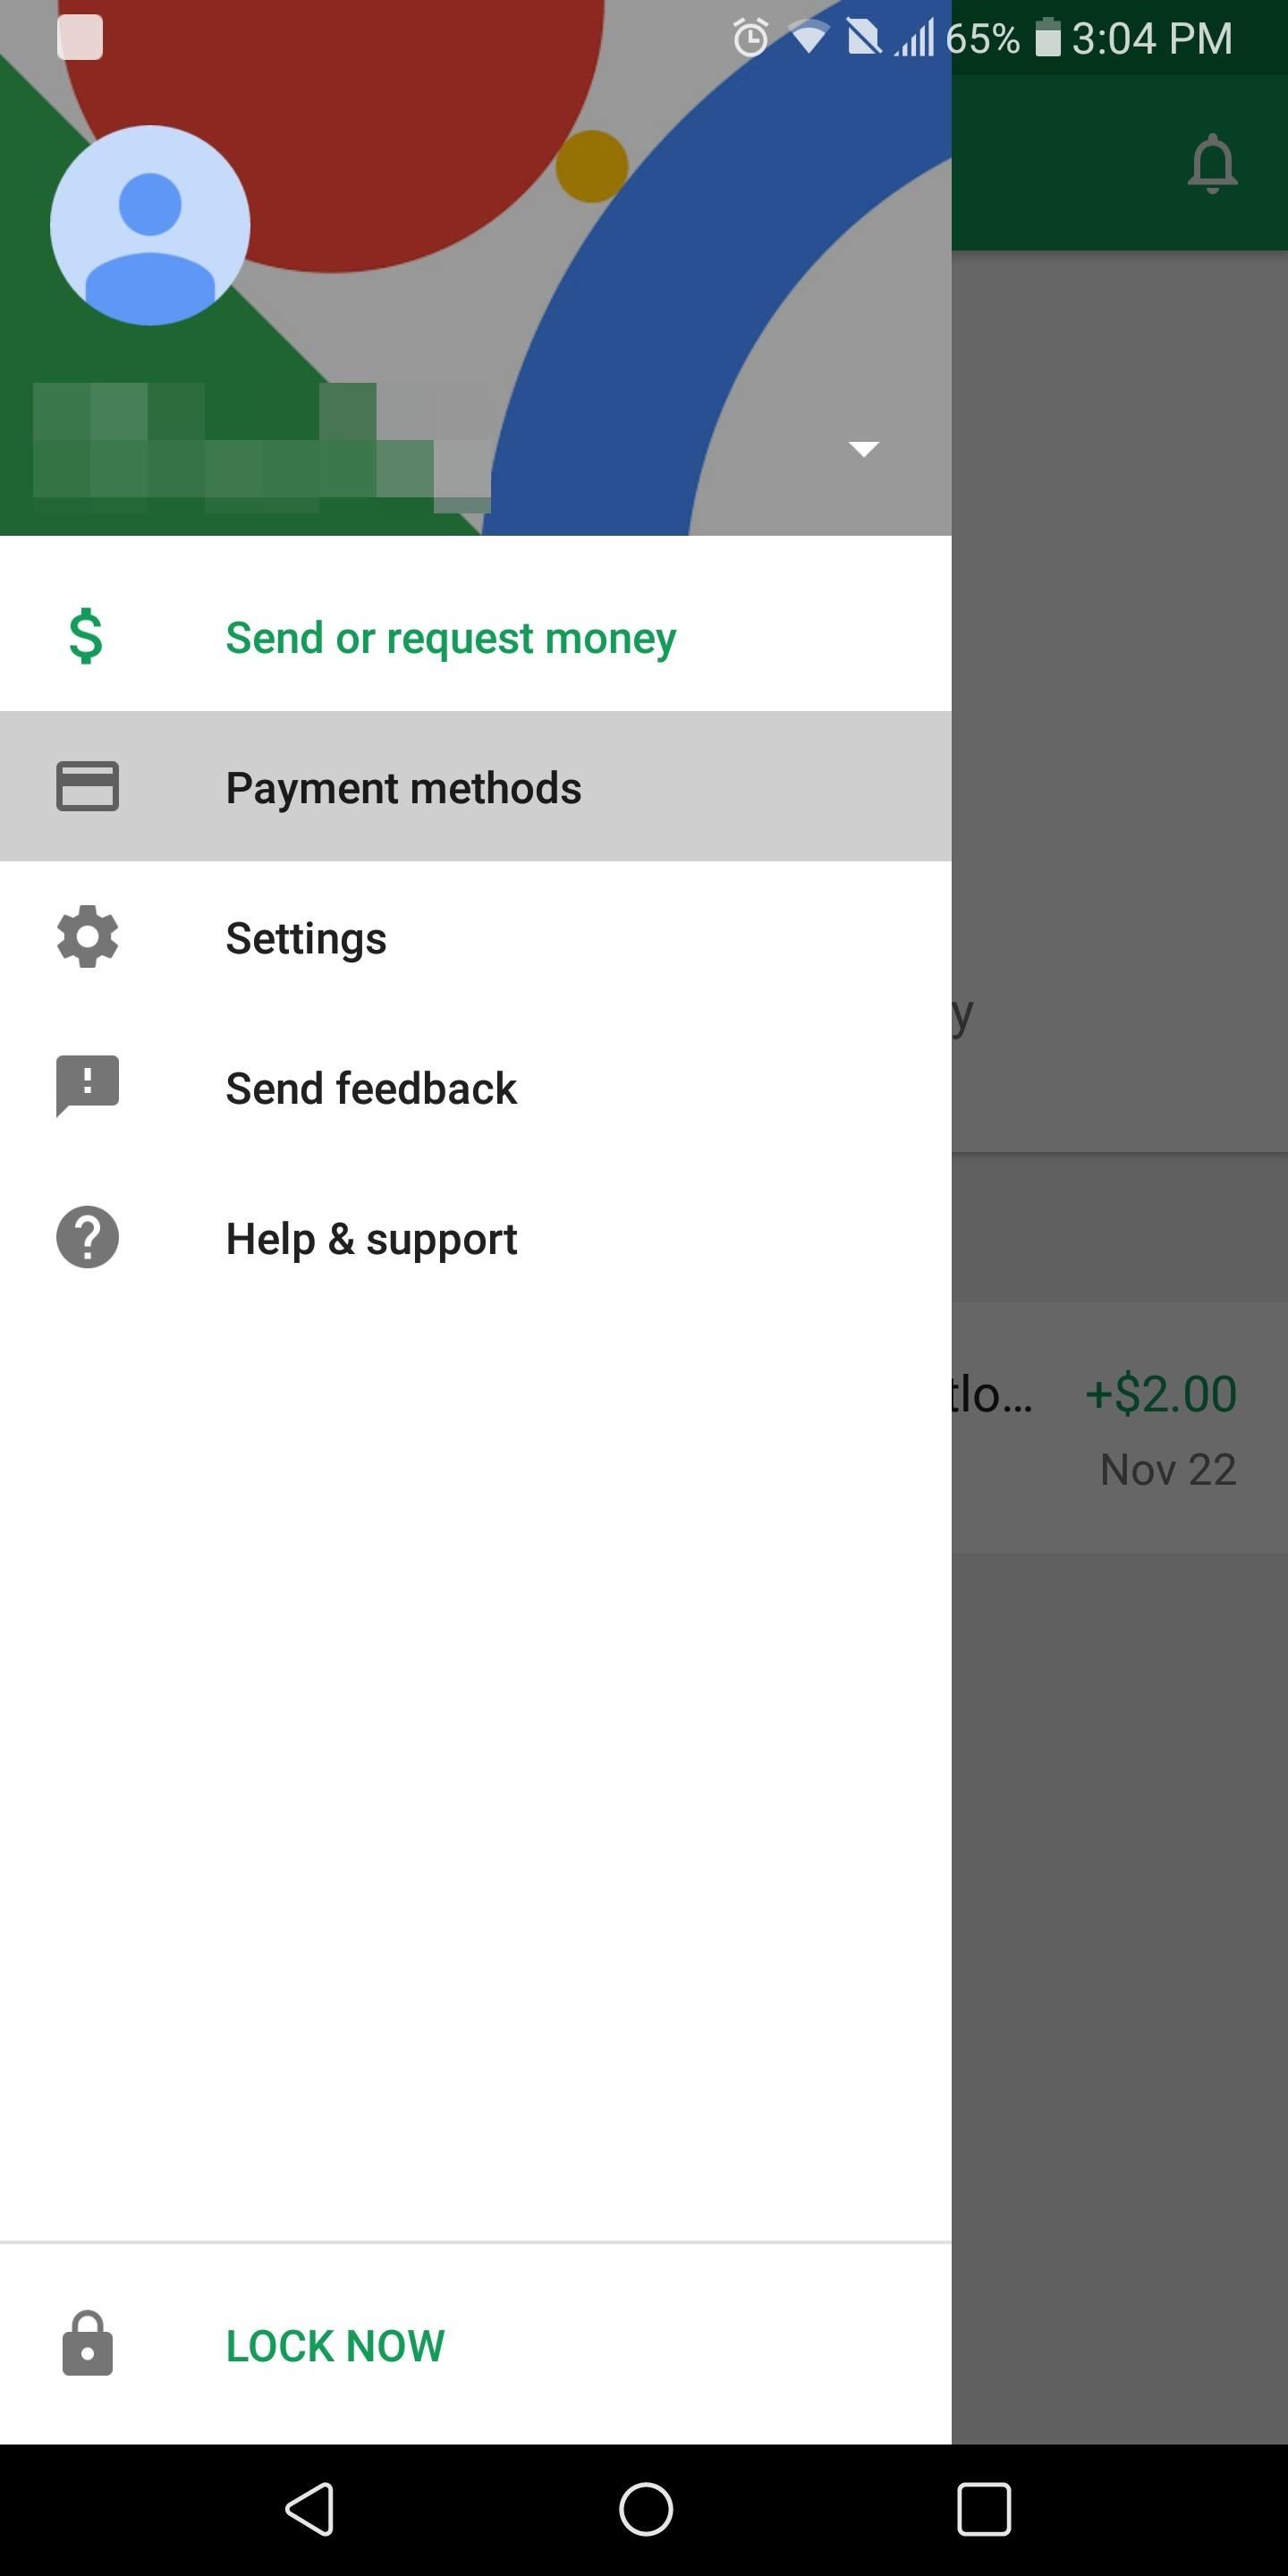
Step 1: Set Up Google WalletIn order to send money, you need to have a Google Wallet account. Fortunately, Google automates this process whenever you add a debit or bank account to your account to purchase apps. Therefore, if you've already purchased an Android app or added a payment source to your Android account, you can skip this step.If you haven't added a card, download the Google Wallet app on your Android device. Once installed, select the hamburger menu in the upper-left-hand corner of your display and choose "Payment methods." Select "Add Payment Method" found along the bottom portion of your screen. By default, Google Wallet will present you the form to set up a debit card. However, if you wish to add a bank account instead, tap the "Add debit card" text to open a drop-down menu with the additional options for bank accounts.Although credit cards, prepaid cards, and PayPal accounts can be added to your Google account to purchase apps, these methods cannot be used to send or receive money. If you've already added that type of account, it will be listed as a payment method in Google Wallet, but won't be available for you to send money.Fill out the form and choose "save" at the bottom of the screen. When you've successfully entered your card, you'll be returned to the previous menu with your card listed as a payment option.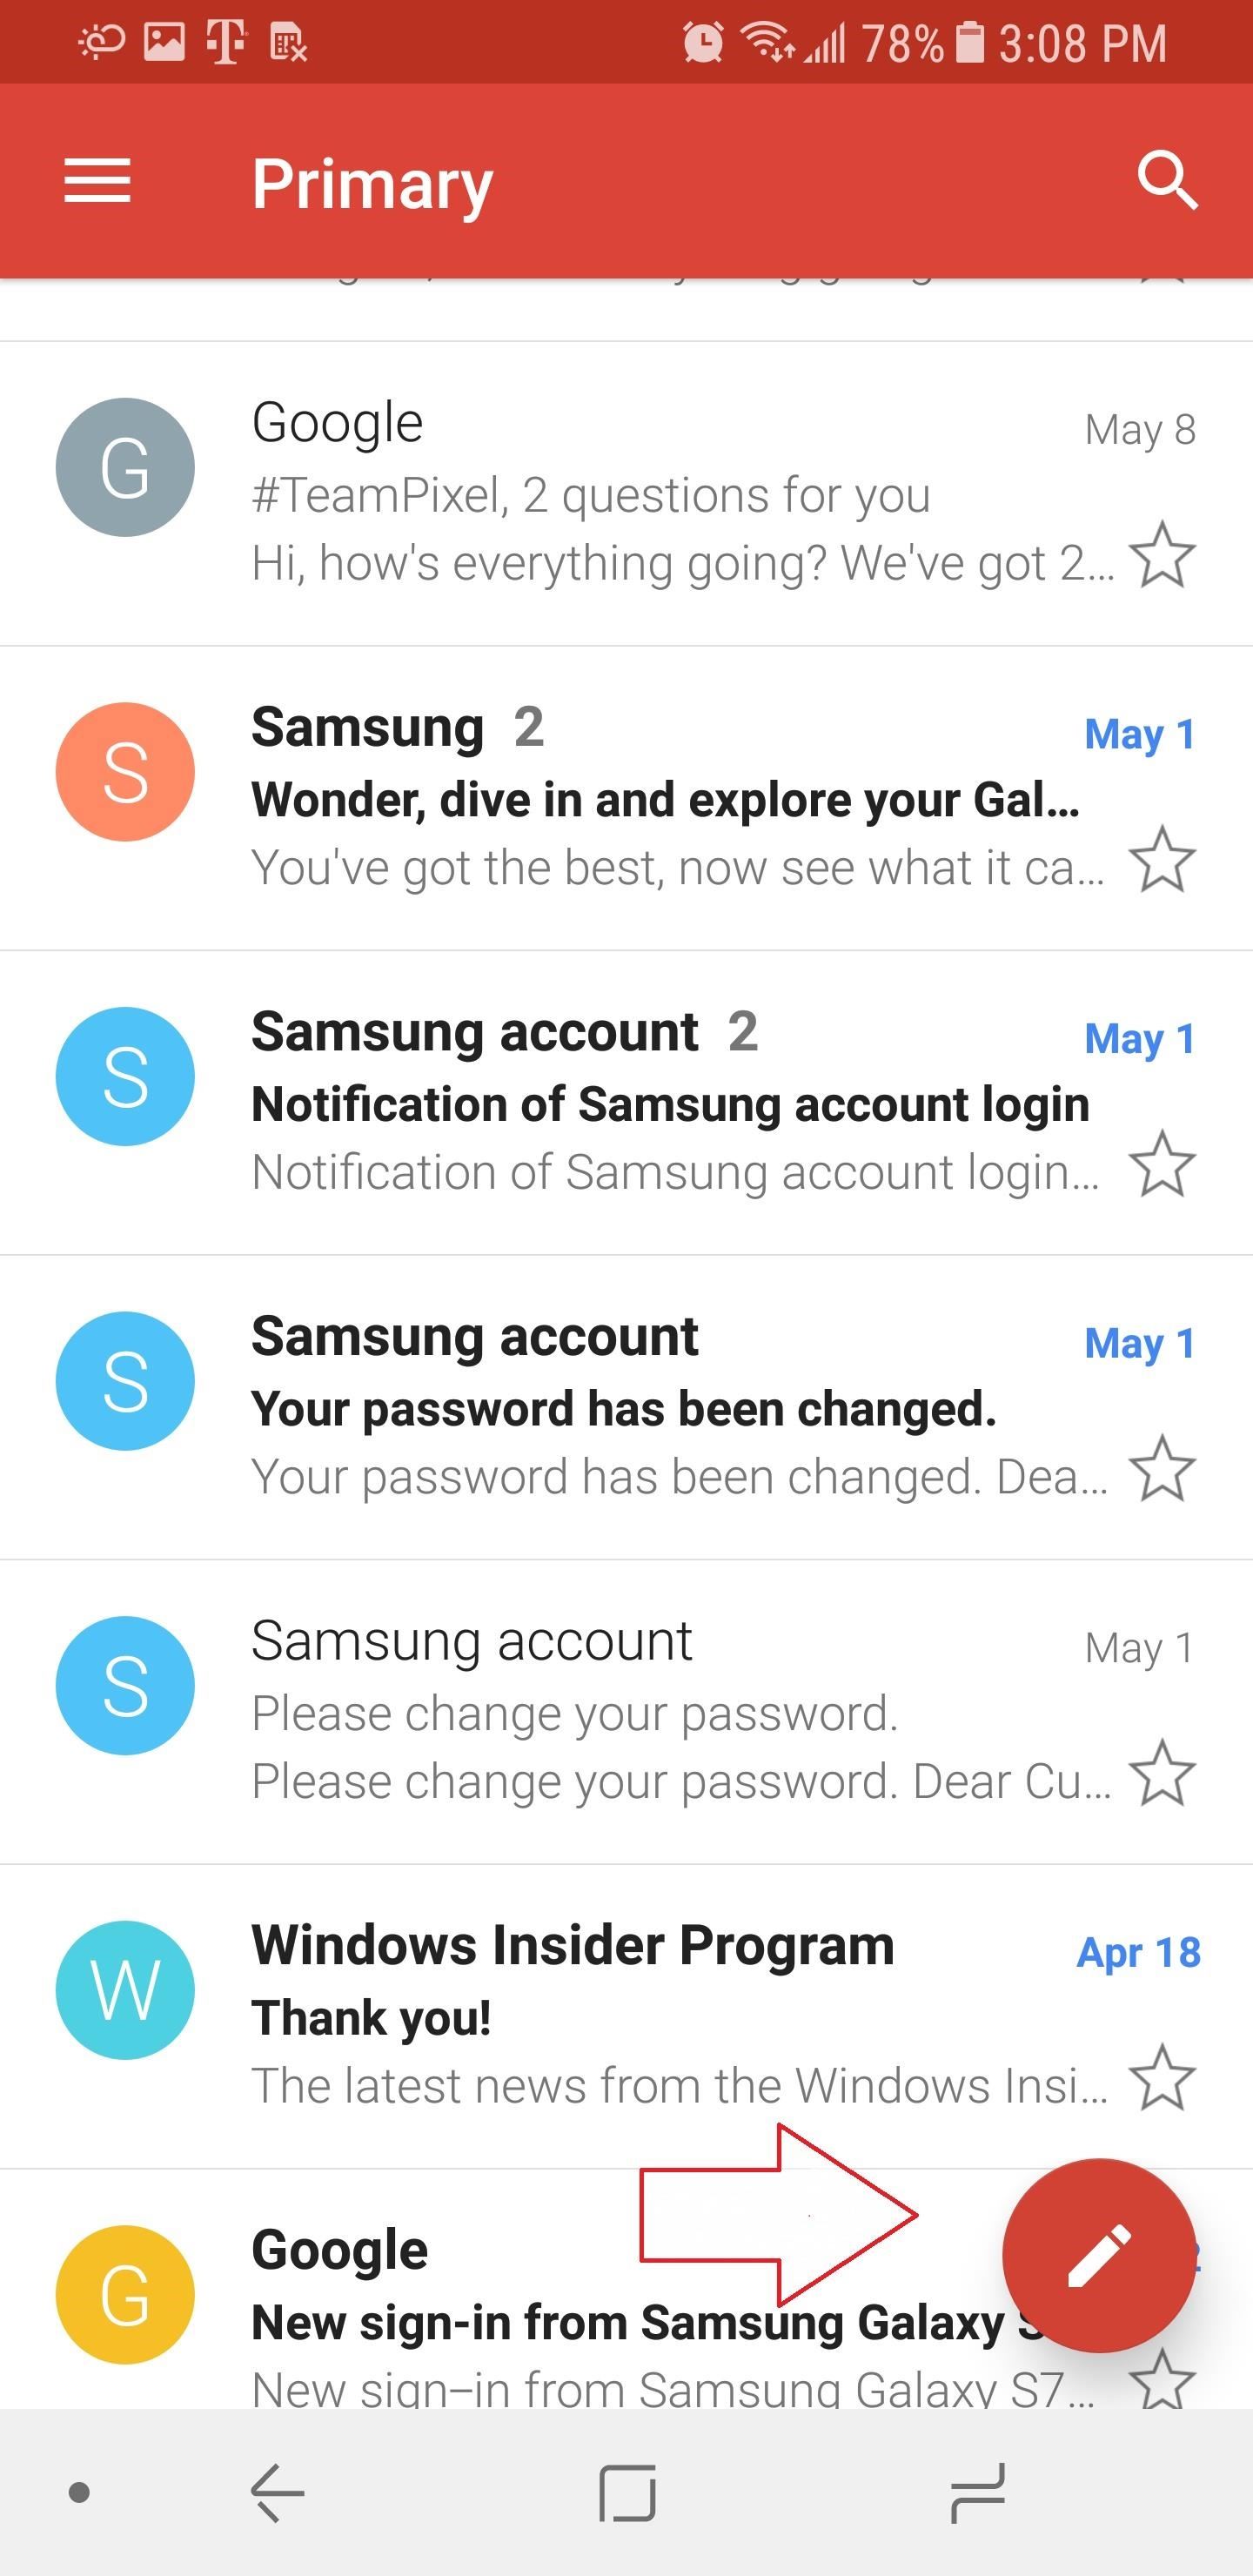
Step 2: Compose an EmailNext, open the Gmail app and use the pencil button in the bottom-right corner of the display to create a new email. If you wish to reply to an email, select the left-facing arrow next to the sender's name while within the email.
Step 3: Send MoneyNext, select the paper clip icon near the top-right corner of the screen and choose "Send Money." A popup menu will emerge asking you to enter the amount you wish to send. Input the amount and select "Attach Money." Another popup will display asking if you wish to add a note. Select "Done," and now within the body of the email will be a notification indicating the money is attached.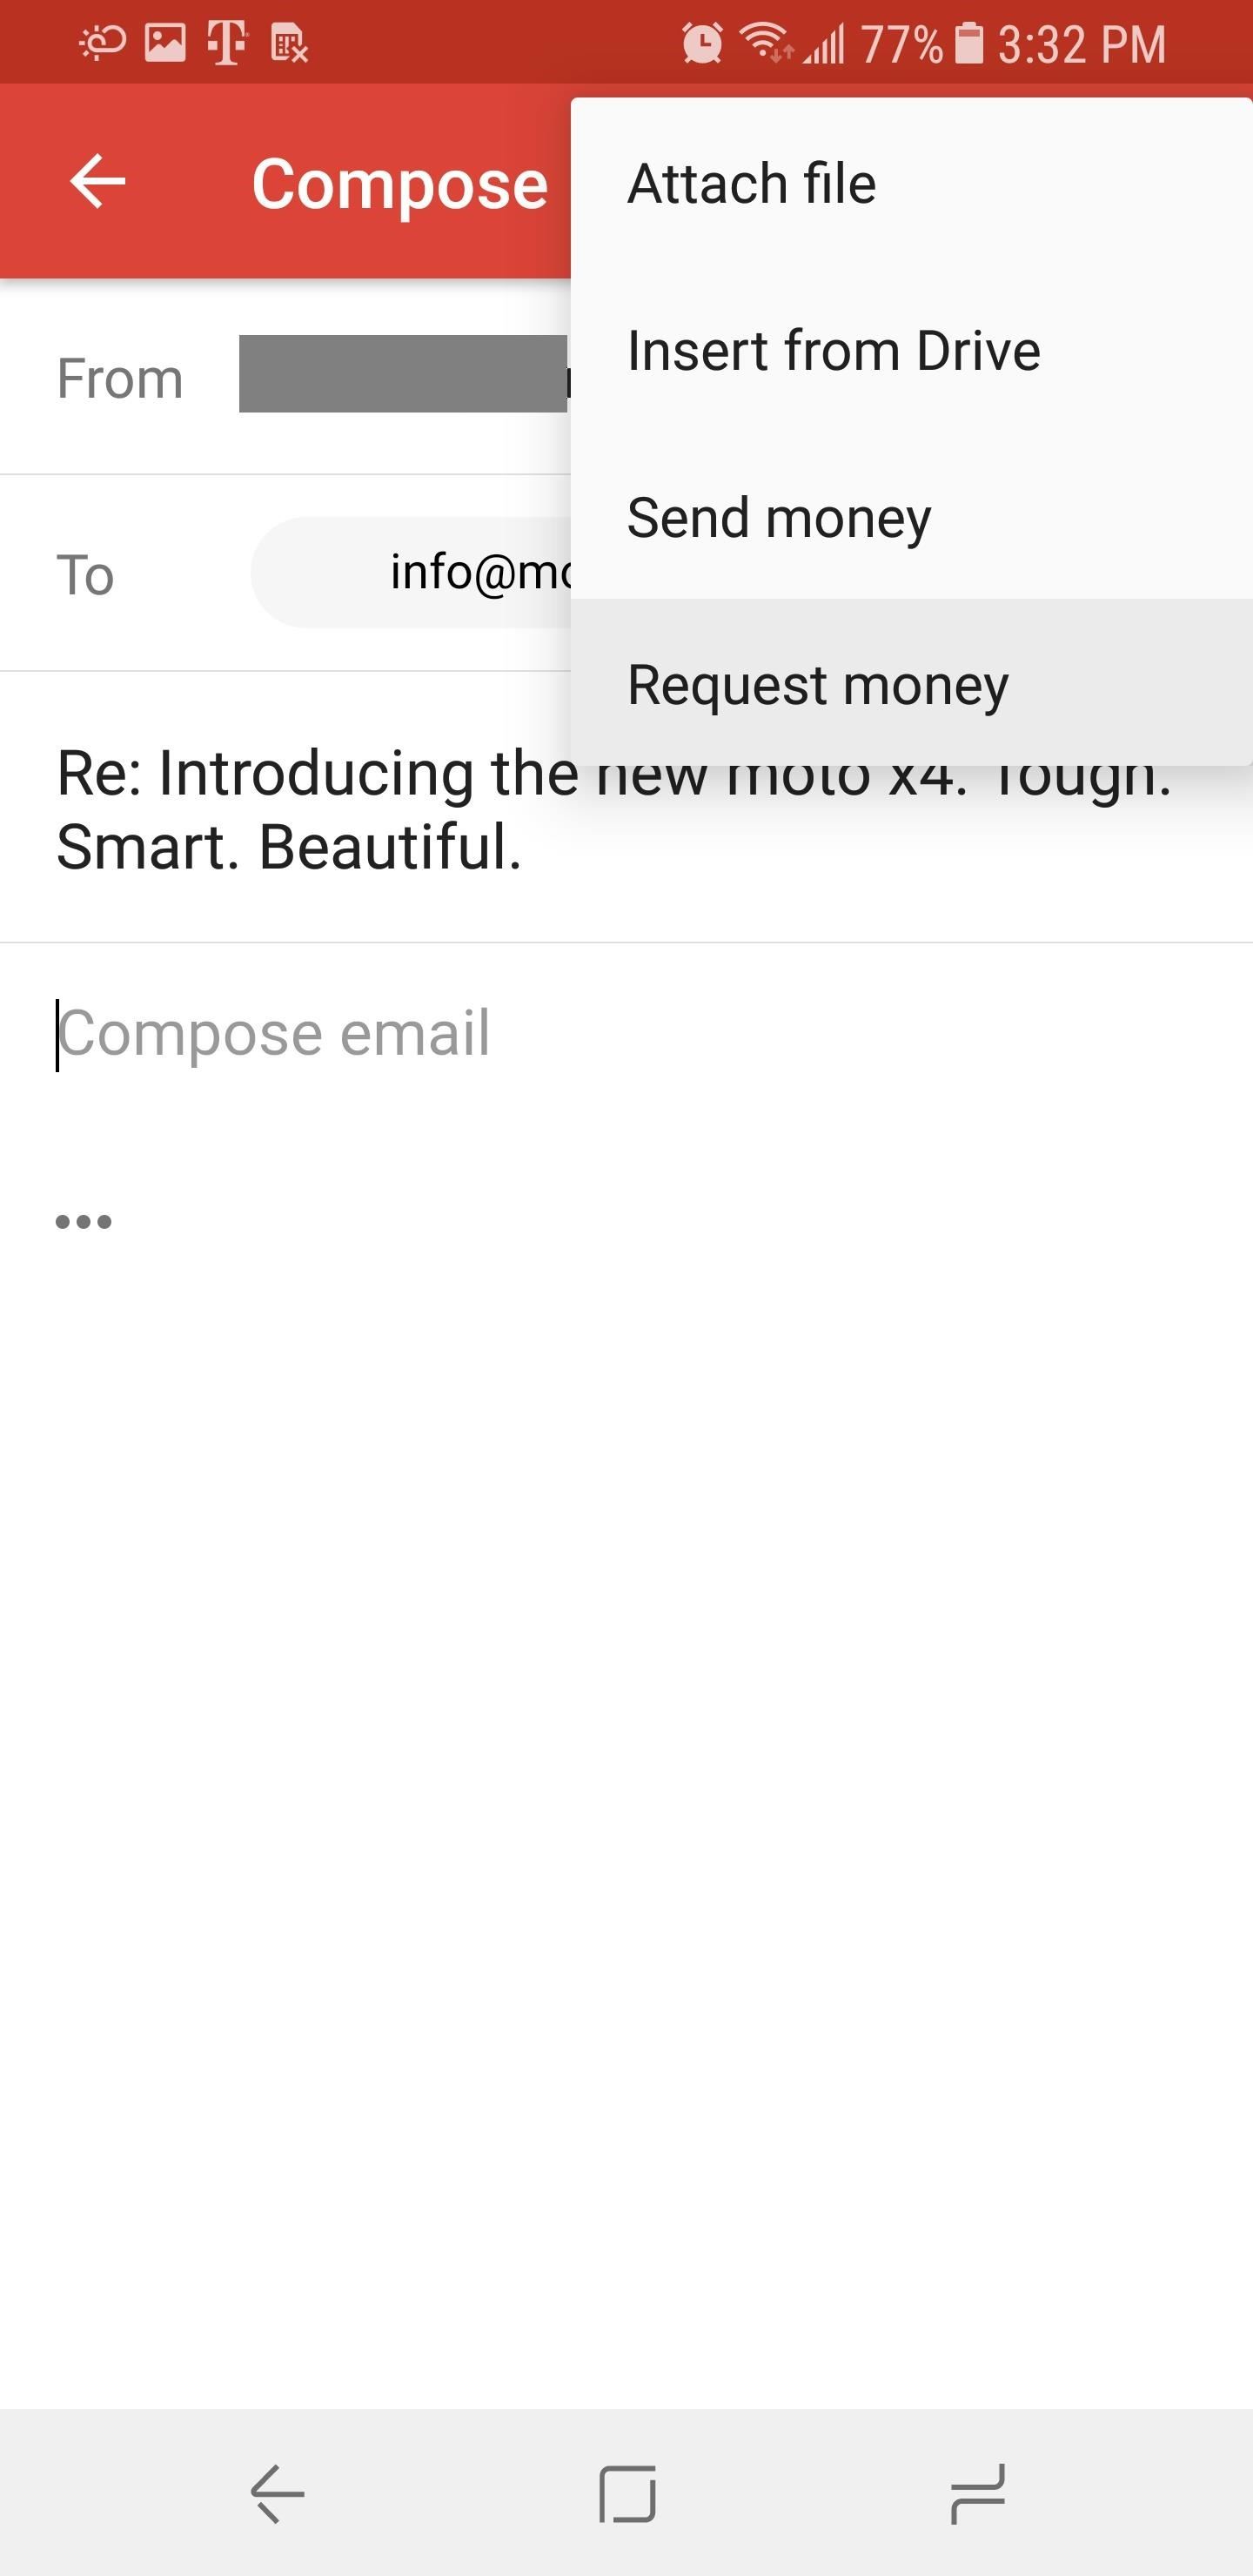
Step 4: Request Money (Optional)If you wish to request money, select the same paper clip icon as mentioned in Step 3, but choose "Request money." Input the amount you wish to receive and select "Attach Request." Gmail will ask if you'd like to add a memo to your request. Select "Done" when you are finished and your request will appear in the body of the email.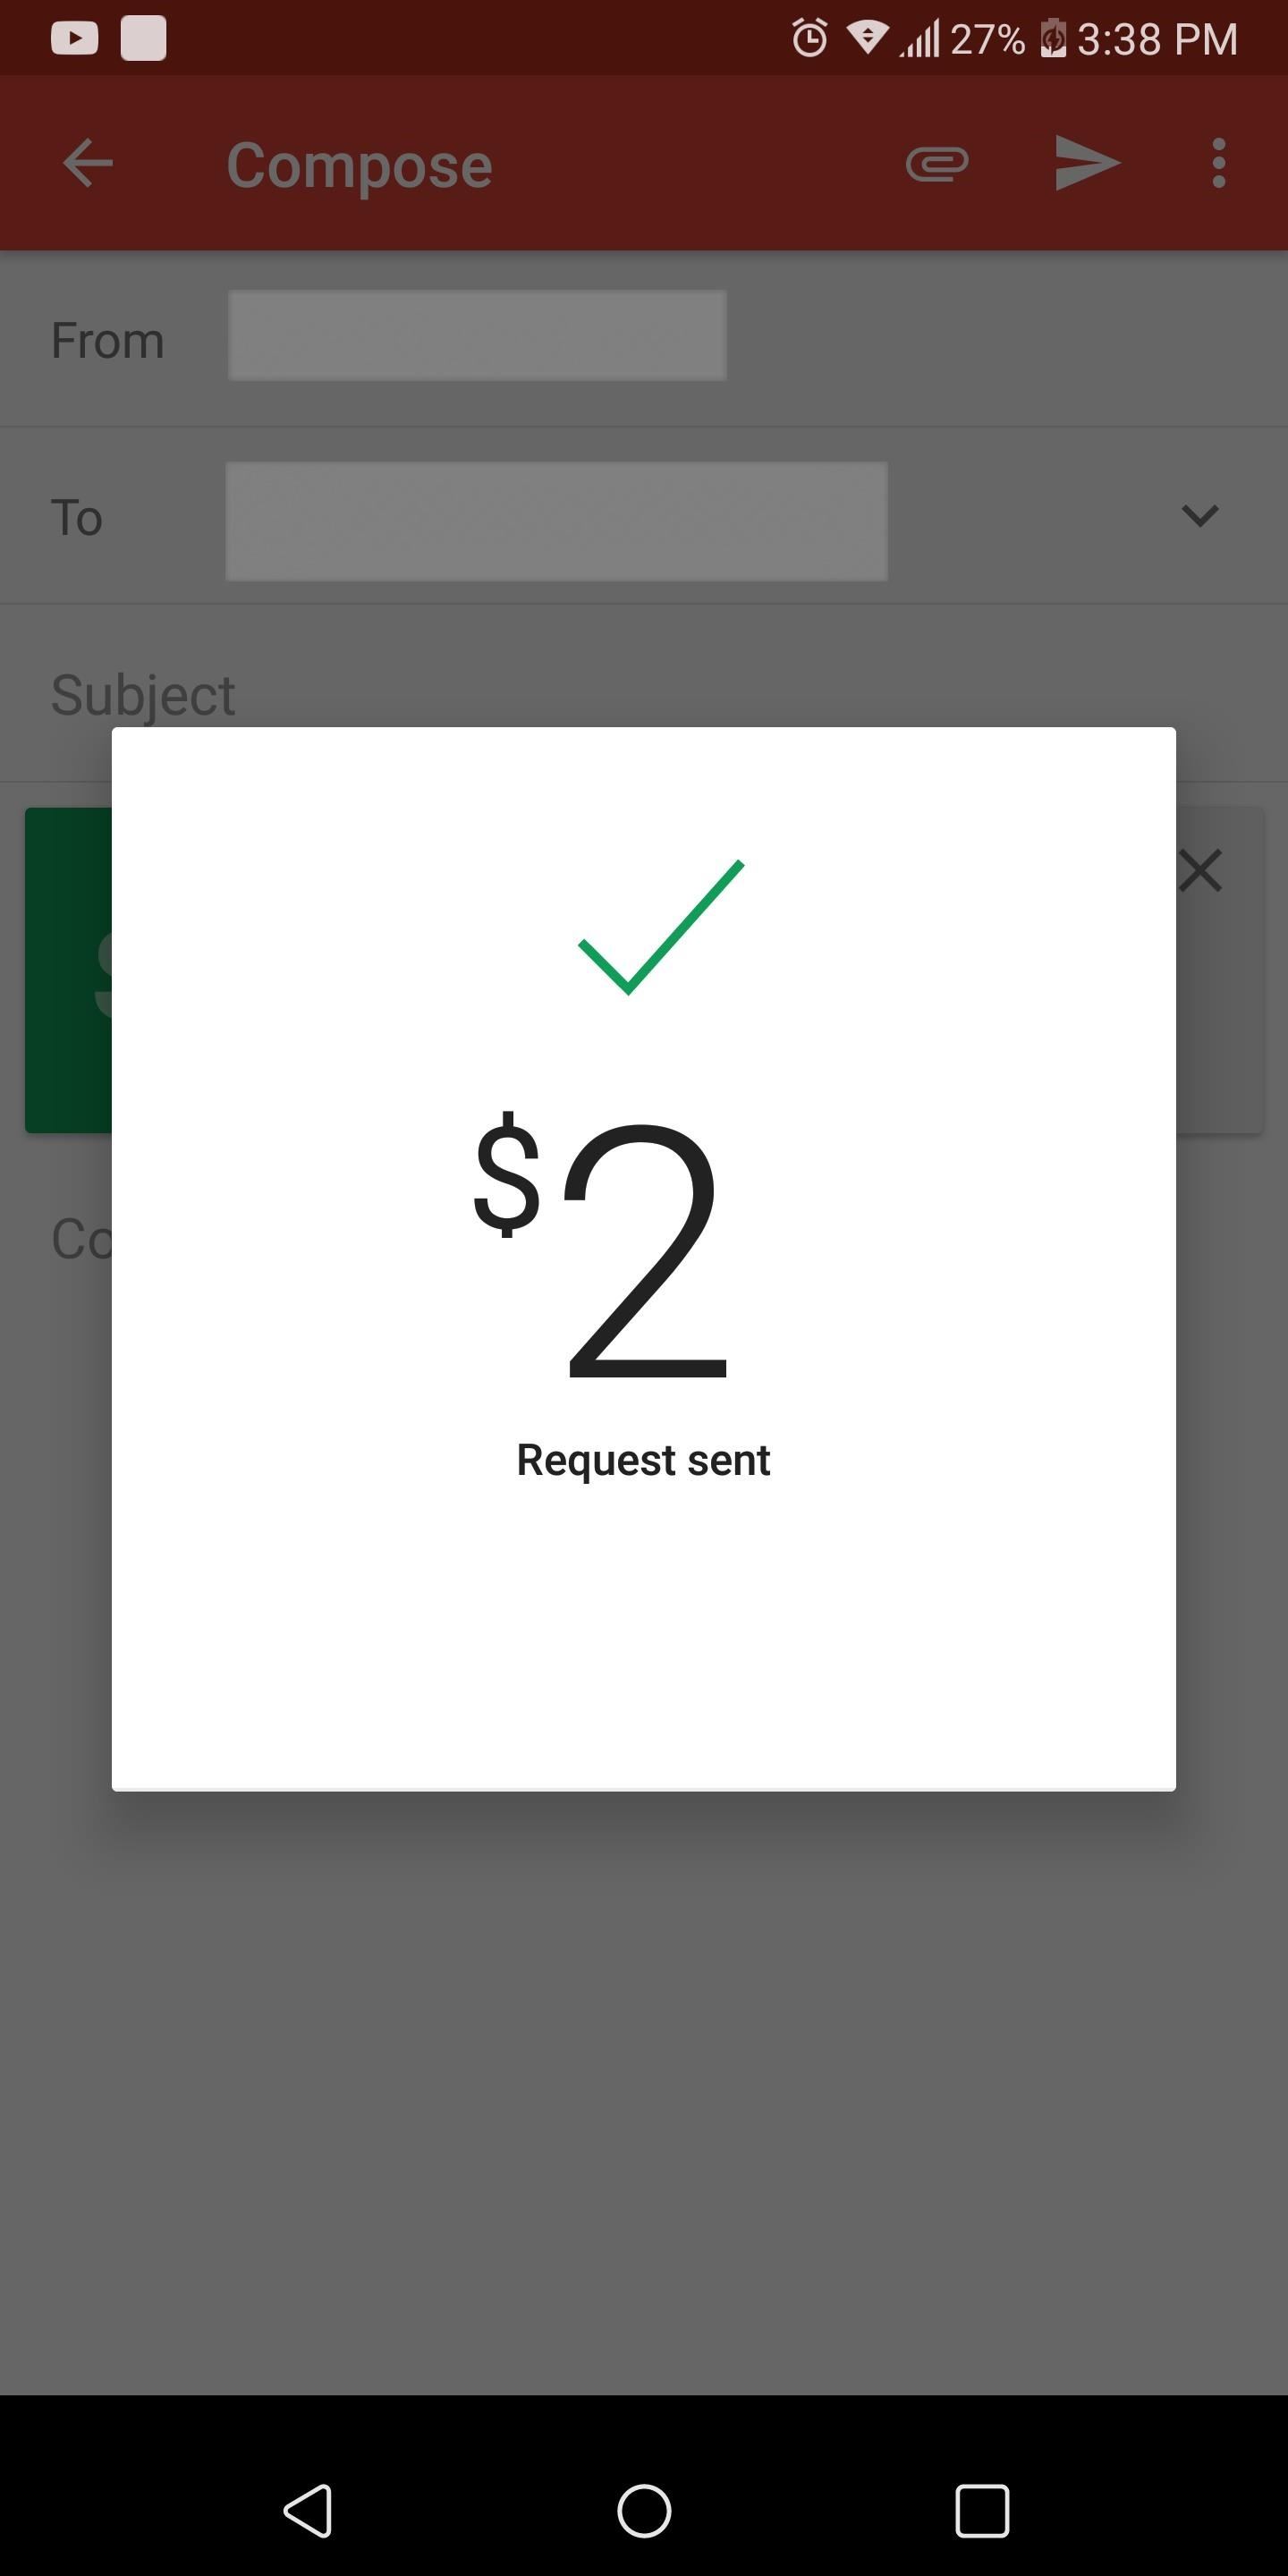
Step 5: Complete the TransactionOnce you either attach a payment (or request for one), complete the email and send it as you normally would. The recipient will receive an email similar to the screenshot below (depending on if you sent money or requested money). If you are sending to a non-Gmail email address, the recipient will get a link to Google Wallet to complete the same signup process depicted in Step 1. However, if you sent money to another Gmail user, they'll see a popup when they open the email with the option to "Transfer to bank" (if they're receiving money) or "Pay Now" (if they're sending money). If the recipient doesn't have a payment method linked to their Gmail account, they'll be asked to add either a debit card or a bank account to complete the transaction. If they already have a Google Wallet account with a compatible payment method, they can simply select their linked card or account to complete the transaction.When receiving money, the amount of time it takes for the money to be deposited into your bank account will depend on two factors: Which payment method you chose and your bank. If you are using a debit card, the payment can post in a matter of minutes, with some banks taking up to 24 hours to show the incoming payment. However, when using a bank account, financial institutions can take up to 72 hours before posting the transaction.
Gmail continues to evolve as a platform, allowing it to capture 21% of the market, which makes it the second most popular email client. How do you like Gmail's ability to transfer money? Are you using the feature? Let us know in the comments below.Don't Miss: Gmail Introduces Gmailify, a Better Way to Manage Non Gmail AccountsFollow Gadget Hacks on Facebook, Twitter, Google+, YouTube, and Instagram Follow WonderHowTo on Facebook, Twitter, Pinterest, and Google+
Cover image and screenshots by Jon Knight/Gadget Hacks
Phone Number Lookup is simply tracing down the person's name, address, city, state, zip and other details.It is either done using free reverse phone lookup or there are reverse phone directories available on the internet.However, our concern is to make it quick and automatic via the Reverse Phone Lookup service.
FREE to Lookup Unknown Callers - ReversePhoneLookup.com
You can find your info, privacy, and security settings all in one place - your Google Account. We have created easy-to-use tools like Dashboard and My Activity, which give you transparency over data collected from your activity across Google services.
Google Account
The Nexus 6P, Pixel, and Pixel XL do not offer an Always on Display feature by default because their screens aren't properly tuned to enter the low power doze state that the Pixel 2's screens are.
How To: Send Your Uber Trip Status to Trusted Contacts if You're Ever in a Sketchy Situation News: Uber in More Hot Water with Pittsburgh Officials as Driverless Deal Sours News: How to Become Body Confident and Gain Self Respect How To: Decode Body Language
How To: Stop Uber from Tracking Your Location in the
The following steps will show you how to make an Automator workflow that you can save on your Desktop or in your Applications folder. You can drag and drop batches of images directly on it, and it will output the resized images in a folder on your desktop.
How to RESIZE IMAGES??? | Page 2 | MacRumors Forums
News: Nexus 6P Bootloop Nightmare Turns Your Phone into a Fancy Paperweight News: Quick Charge 4.0 Is Coming Even as Google Warns OEMs Against It News: Google's Nexus Chargers Could Be Dangerous—Here's Why You Need to Be Careful
Nexus 6P Bootloop Fix Has Been Found - Here's How it Works
To quickly disable the notification, just toggle the slider to off. A note will display letting you know this notification won't show up anymore. Again, this is only for the app that's currently running—a new notification will show up if another app is displaying over other apps. This is a very granular setting.
How to Disable the "Is Displaying Over Other Apps
Auto-Correction uses your keyboard dictionary to spellcheck words as you type, automatically correcting misspelled words for you. To use it, just type in a text field. To make sure that this setting is turned on, use these steps: Open the Settings app. Tap General > Keyboard. Turn on Auto-Correction. By default, Auto-Correction is on.
How to Disable Auto-Correct on iPhone Completely
osxdaily.com/2015/01/06/disable-auto-correct-ios/
If you're fed up with auto-correct on the iPhone erroneously changing words to things you did not intend to type, you can opt to disable the auto-correction feature completely in iOS. Doing away with this feature is not recommended for most users, but choosing to turn off autocorrect can be a
How to Turn off Autocorrect on iPhone or iPad | Digital Trends
Lumenec LED Strip for Signs - Applying the strip - YouTube
How To Block Your Number From Caller ID: Temporarily Block Your Number: To temporarily block your number from the caller ID of the person that you're calling you must dial *67 before dialing the phone number that you are about to call. This will temporarily deactivate the person's caller ID, instead, "private number" will appear.
How to block your phone number from caller ID | Komando.com
How To: Get Floating Notifications & App Windows on Your Samsung Galaxy S4 How To: There's a Hidden Feature in Nougat That Gives Your Android Phone or Tablet a Desktop-Like Experience Forum Thread: Enhancing Your Android Productivity with Floating Apps (Multitasking) 0 Replies
Floating Apps - Real multitasking on your Android!
Maybe il try and port lg g watch rom to the gear im a bit rusty tho
How to Set Up & Use an Android Wear Smartwatch on Your iPhone
The boot animation is the first thing that you see when powering on your Android phone or tablet, after the operator or manufacturer logo. Although it does not serve a purpose functionally, an eye-catching boot animation can certainly make your device stand out while booting.
How to Change Your Boot Animation - Android Basics 101 - XDATV
How to Navigate the home screen on Android cell phones (2.0
How to reset the Photos App Delete option in Windows 10 I opened my photos with photo application and pushed the delete trashcan. I choose, marked the box not to show the pop up anymore just delete.
How To Reinstall The Mail App In Windows 10
0 comments:
Post a Comment