How To: Install Android L on Your Nexus (Fastboot Method)
Update, November 12, 2014: Android 5.0 Lollipop is officially out now. If you haven't gotten the OTA yet, check out our new guide on installing the official Lollipop builds on any Nexus for download links and instructions, for Mac or Windows.Google I/O 2014, the annual developers conference for Big G, introduced a plethora of new goodness. From Android Gear to Android Car to Android TV, it was quite the showcase. But the one common theme among the reveals? Android. Google also gave us the first true look at Android L, and it's slated to be the biggest change to Android since its inception.Luckily for owners of the Nexus 5 and the 2013-edition Wi-Fi Nexus 7, Google has made the developer previews available for download and installation. We know you want Android L on your Nexus, so grab your device and let's get it done.I'll be showing you this method using a Windows 8 PC, but the steps should be quite similar for other operating systems.Note that Android L can also be installed through an automated process using the Nexus Toolkit and WIndows—check out Dallas' guide on that if you'd rather not mess with fastboot commands.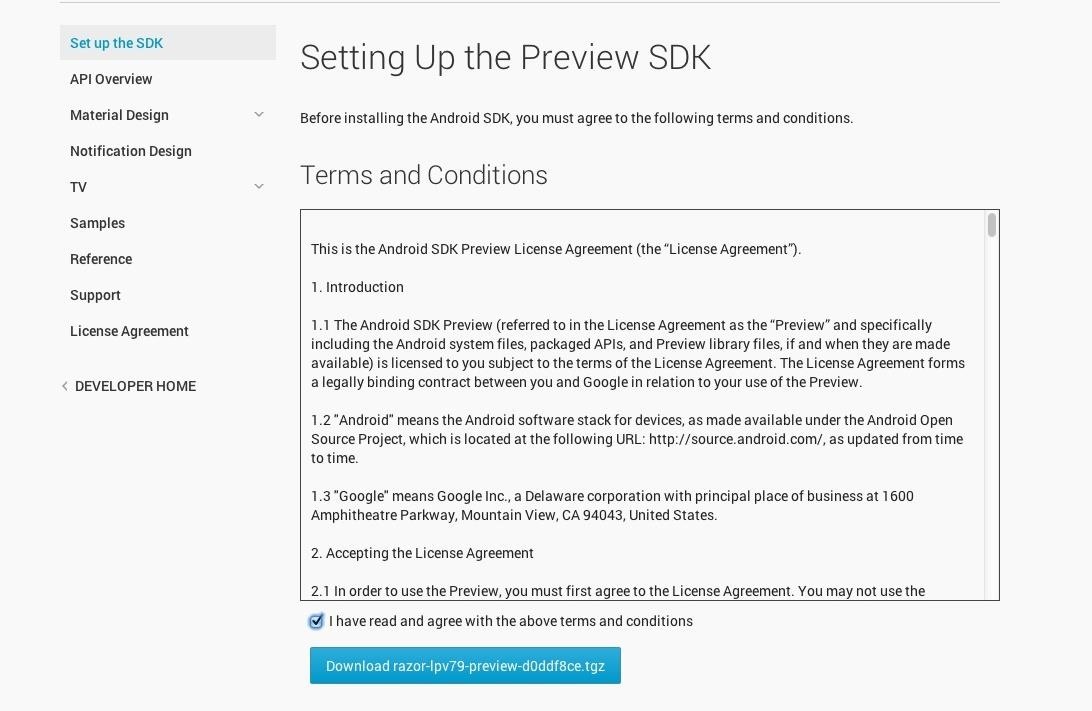
Step 1: Download the Necessary Files to Your ComputerTo flash the new OS, you will need to download the Android SDK, which includes fastboot, the tool you'll use to install "L" on your device. Once you have it, make sure to place it somewhere you can easily find it later, like your desktop—it will be called ADT Bundle.You'll also need the Android L factory image, so head over to the Preview SDK page and download the appropriate .tgz file, either for Nexus 5 or Nexus 7. You will have to agree to the terms to continue. Once it's downloaded, place it in the Platform Tools folder inside ADT Bundle -> SDK. If you did everything right, you'll have fastboot and flash-all in the same directory.
Step 2: Enable USB DebuggingNext, make sure that USB debugging is enabled on your Nexus so that it can communicate with your PC. Head to Settings -> Developer Options and make sure that "USB debugging" is checked.If you don't see Developer Options, just follow this ridiculously easy guide to unlock it.
Step 3: Put Your Nexus in Fastboot ModeMake sure that all of the above has been completed and that you have backed up any important documents, images, and messages (apps and contacts will be restored if they were linked to your Google account). This process will wipe your device and put it back to its original factory state.When ready, power down and enter fastboot mode. To do so, turn your device off, then back on by holding the Power and Volume down buttons—this will take you to your device's fastboot menu.
Step 4: Connect Your NexusConnect your device to your computer via USB and put it aside—the next time you'll interact with your Nexus will be once the new OS is up and running.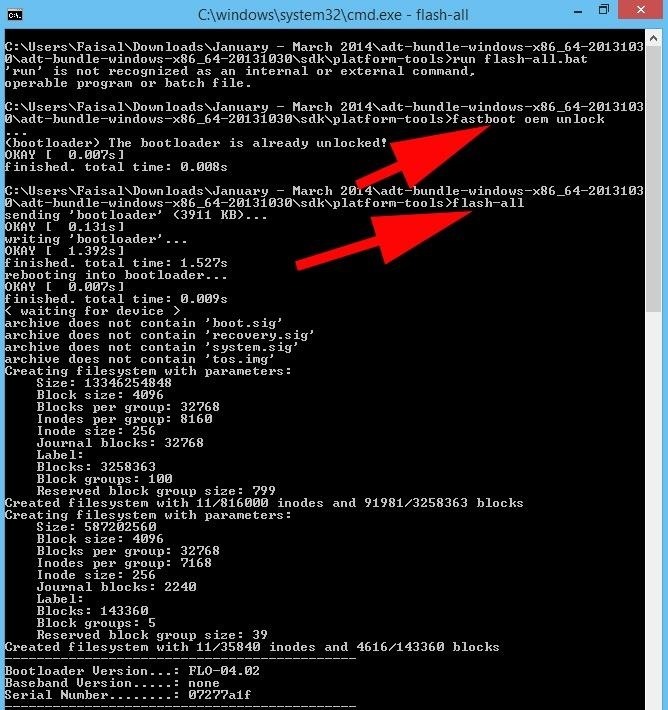
Step 5: Flash Android LOn your computer, head to the Platform Tools folder we copied the extracted images files to (from Step 1), then hold the Shift key, right-click in the folder, and select Open command window here.If you've never performed any hacks or mods on your device, you'll likely have a locked bootloader, which we'll need to unlock in order to continue. In the command prompt, type the following, followed by the Enter/Return key:fastboot oem unlock Now you're ready to flash the Android L factory image, so type in the following:flash-all The process can take a few minutes, and when it's done, you'll see the last command line say Press any key to exit...—press any key, and unplug your USB cable. At this point, your Nexus device will be booting up (give it time), after which you'll be at the main setup screen.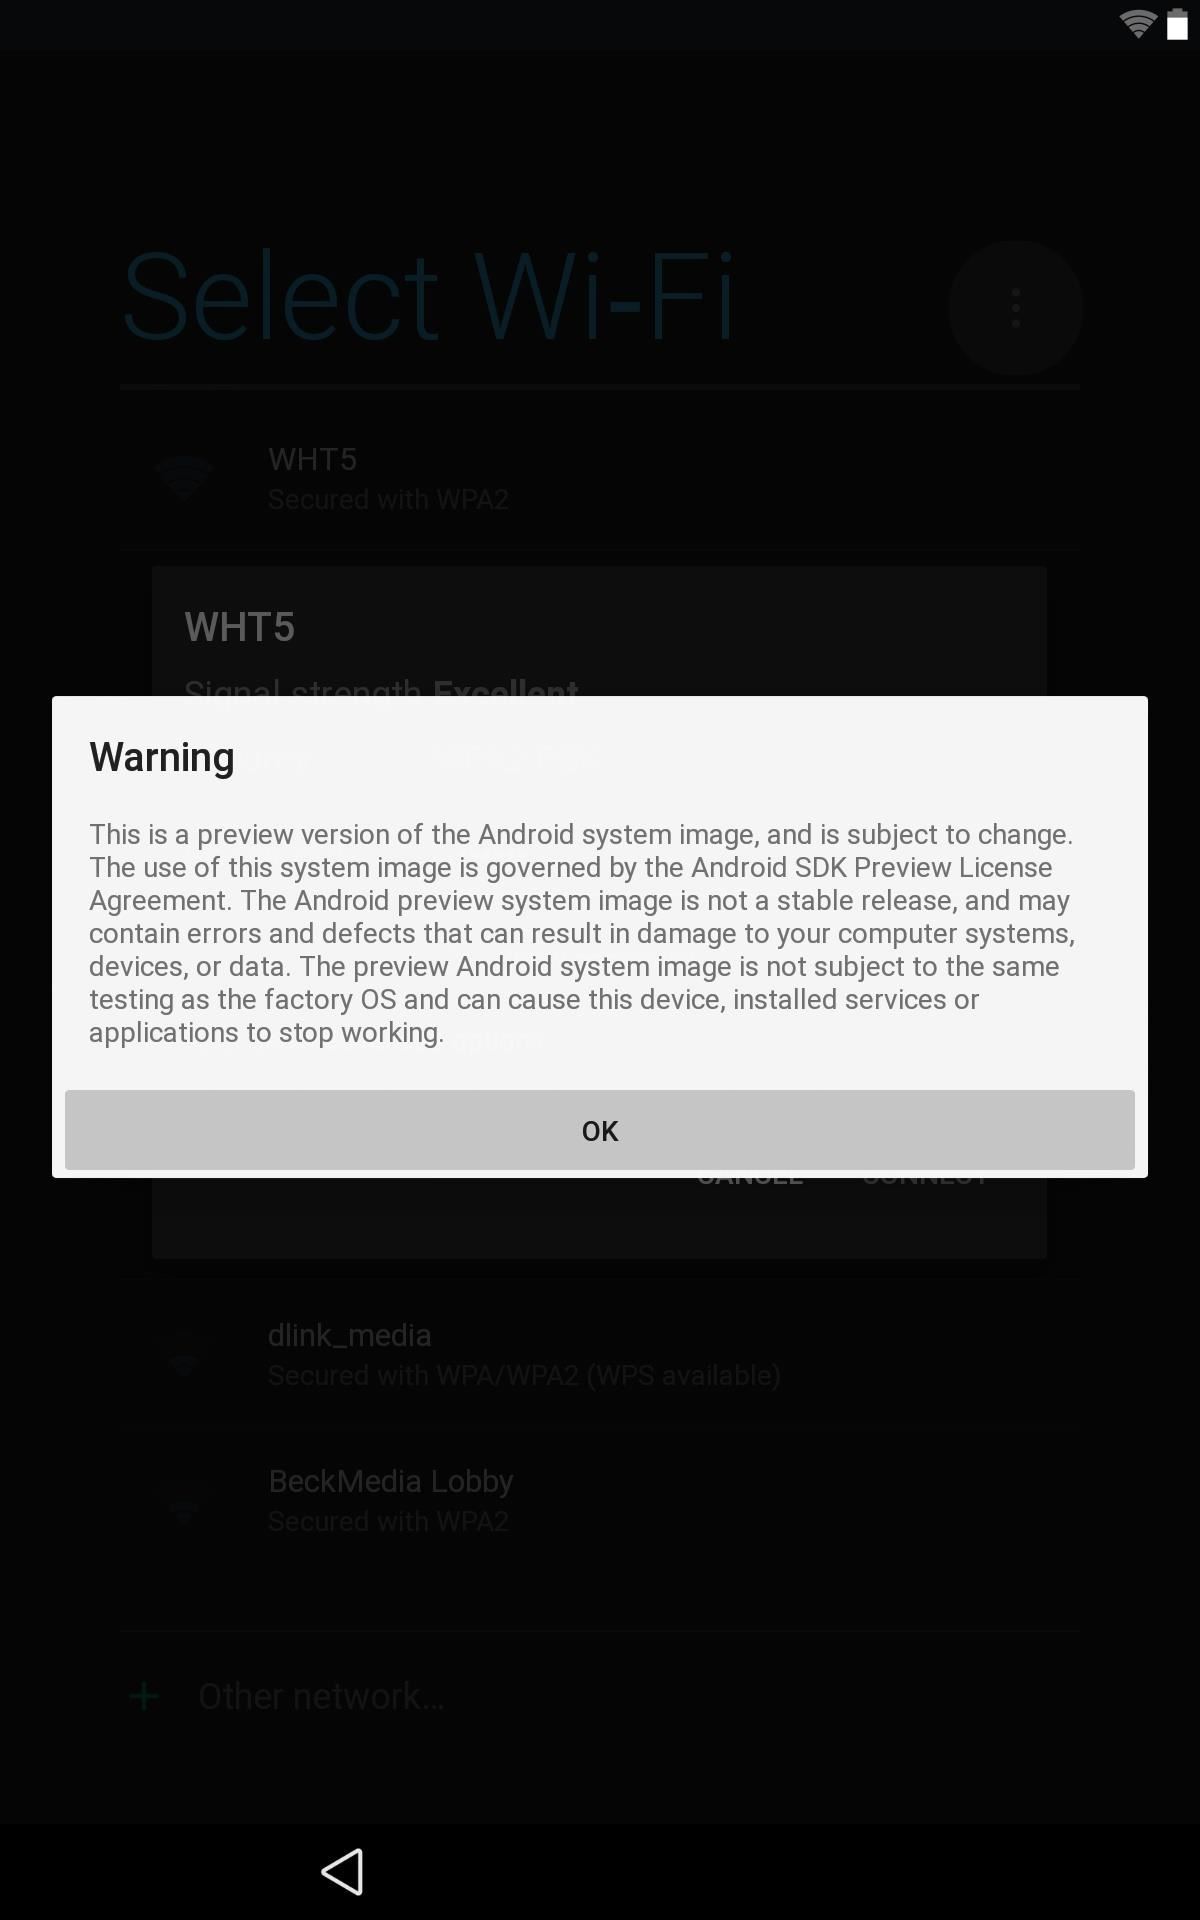
Success!That's it! With a few simple steps, you're now using the absolute latest and greatest from Google. Have fun looking around, and let us know what you think. This is a big change from the Android we all know and love, and I like it!
Facebook may connect millions of its users to each other with its messenger service, but it can also make it very difficult to avoid those annoying "friends.". The problem is, when you use the default Facebook Messenger app, you get the added bonus of a timestamp added to messages that you have seen.
How to read messages and remain Undetected on Facebook Chat
So I think majorly you want to achieve these two things. 1) Hide his updates from your Newsfeed 2) Show your status as offline, always (only to him) Yes? Both are possible. for (1) hover over your friend's name and deselect "Show in News Feed"
How to Find Out If a Facebook Friend Blocked You | It Still Works
When creating roofs in SketchUp, you can use Intersect Faces to combine a whole bunch of gables, hips, dormers, sheds, and so on into a single roof. Doing so is no cakewalk, and it requires a fair amount of planning, but it works great when nothing else will. The figure shows a complicated roof with
SketchUp's Intersect Faces Tool - dummies
Add AutoSilent to your iPhone to bypass a broken silent switch. AutoSilent is available in the Cydia application store for a fee. AutoSilent allows you to do a variety of other things, as well as manually setting your ringer and vibration settings, whether your silent switch is engaged or not and even if it is broken.
Use Ring/Silent Switch to Lock Screen Rotation in iOS 9 on
SoundCloud is a music and podcast streaming platform that lets you listen to millions of songs from around the world, or upload your own. Start listening now!
SoundCloud 101 « Smartphones :: Gadget Hacks
Test this on your own Snapchat first. To be extra safe, send a Snapchat to yourself. Try this method on this Snapchat first, so you're sure it's working before you try it with someone else's photo. This method should work on Stories as well, but test it on your own private Story first. Some people can get this to work on Snapchats but not Stories.
News: iOS 11.4.1 Beta 4 Released for iPhones, Includes Only 'Bug Fixes' & Unknown Improvements News: Apple Releases First iOS 12.1 Beta to Software Developers, Brings Back Group FaceTime News: iOS 11.3 Beta 5 Released with Mostly Under-the-Hood Improvements
Apple Releases iOS 10.3.3 with Bug Fixes and Security
How To: Blend Your Android's Status & Nav Bars to Match Any App's Color Scheme How To: Remove the Navigation & Status Bars on Your Nexus 7 Tablet to Make the Screen Feel Bigger How To: Move the Obtrusive Volume Indicator Box to Your iPhone's Status Bar
How to Make the Volume Slider Less Annoying When Playing
Any Video Converter Free is one of the greatest all-in-one video converting tool that work as a video downloader & converter as well as video editor. Besides, It can also extract audio tracks, sound or background music from videos and rip audio tracks from CDs. With Any Video Converter (AVC), most of the video formats can be converted into
Extract Audio From YouTube Video. Easily! - Driver Easy
Despite the restriction, you will be able to play your favorite YouTube videos in the background in Safari on your iPhone and iPad with ease. Jump right in to put your hands on these cool tricks!
Listen To Youtube Background Audio On iOS 11 With This Trick
You can now group iPhone notifications per app or sender. Let this article guide you. With the rolling out of iOS 12, Apple made changes to help you easily have control over your notifications. One way of having better control of your notifications is to have them grouped into topics, sender, or app types.
iOS 12 Hands-on: Grouped Notifications And Instant Tuning
How to get your music onto pandora internet radio. Pandora's new 'thumbprint' algorithm turns your likes into a how to edit an existing music station on pandora radio internet playing create own
Pandora Internet Radio Station List | Mount Mercy University
How To: Connect a stereo Bluetooth headset to an Apple iPad How To: Use AirPlay in iOS 4.2 for the iPad and iPhone to throw content between device How To: Jailbreak your iPhone, iPad or iPod Touch using the Spirit software How To: Sync your iPod to more than one computer
Can I pair 2 Bluetooth headsets to my iPad simultaneously? We
0 comments:
Post a Comment