How To: Root the Nexus 6P or Nexus 5X on Windows, Mac, or LinuxThe Foolproof Guide
This year, Google released two Nexus phones to glowing reviews, and as we've grown to expect, the Android community wasted no time in coming up with a root method for both. In fact, legendary root developer Chainfire even devised an entirely new "systemless" method for rooting that should make updating a bit less complicated, along with a few other benefits.Don't Miss: All the Android Terminology You Need to Know The new method roots your device without modifying Android's system partition at all—hence the systemless root moniker. This means that fewer of Android's built-in security measures need to be bypassed in order to gain root access, and in turn, early reports even indicate that Android Pay works with this new method.Provided you have a PC, Mac, or Linux machine, rooting your shiny new toy is a relatively simple process. There are quite a few steps involved, though, but I'll go over each of them in as much detail as possible to make sure everything goes off without a hitch.
Before You BeginRooting an Android 6.0 Marshmallow device requires that you install a modified boot image, which means you'll need to unlock your device's bootloader. The process of unlocking your bootloader will wipe all data on your phone, so make sure you have any important files backed up on an separate storage device.Additionally, you'll need to connect your phone to your computer to run a few commands. Considering that the Nexus 5X and 6P are among the first devices to ship with a USB type C connector, and most computers still use a USB type A connector, this means that you will likely need a USB-C to USB-A cable. For a list of these types of cables that fully comply with the new USB-C standard, head to this link.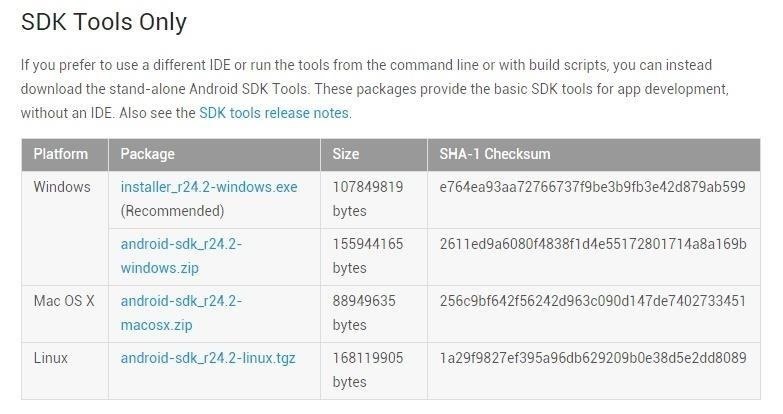
Step 1: Install the Android SDK on Your ComputerTo begin, you'll need to grab a copy of the latest Android SDK. From your computer, head to the official site to download the file for your particular operating system. The installation process will vary depending on your operating system. Windows users can simply launch the EXE file and follow the provided instructions to install the full Android SDK, which will be saved in the C:\Program Files (x86)\Android\ folder. Linux and Mac users will have to extract the contents of the ZIP to a folder that can be accessed easily. Take note of this folder's location, as you will need to copy some files here later. From here, if you're using a Linux or Mac machine, open a terminal window and change directories to the /android-sdk-linux/tools/ or /android-sdk-macosx/tools/ folder that you just extracted. Next up, type android sdk (Linux) or ./android sdk (Mac) to launch the SDK Manager. After that, you'll need to download the Platform Tools package if you're using a Linux or Mac computer. Select the "Android SDK Platform-tools" option, then click the install button to take care of that.
Step 2: Install the ADB & Fastboot Drivers on Your ComputerNext up, for your computer to be able to fully interact with your Nexus, you'll have to make sure you have the ADB and Fastboot drivers installed on your system.Windows Users:If you own a Windows PC, you can download the drivers at this link. Just run the file, then follow the prompts, and you'll be good to go.Linux Users:If you're a Linux user, download and extract this ZIP file, then run the script with Terminal.Mac Users:For Mac users, the process of installing the proper drivers is a bit more involved. Please see our guide on the topic for more information.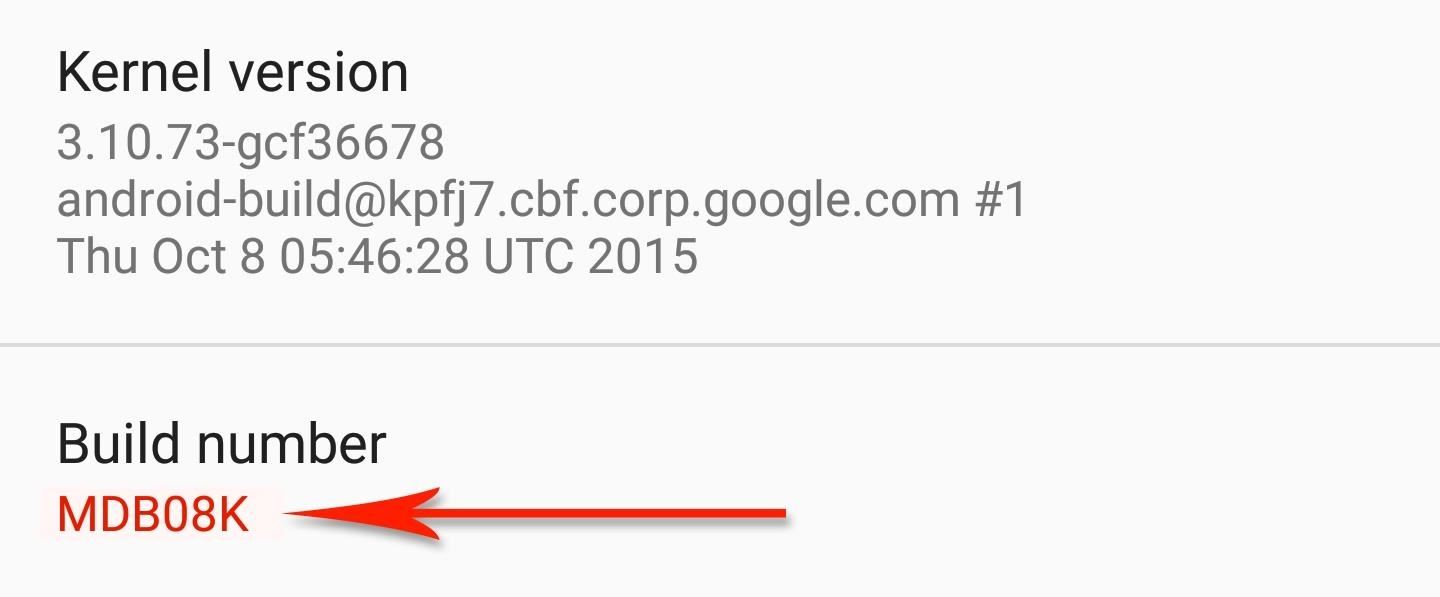
Step 3: Download the Neccesary FilesIt's very important that you download the proper root files for your device and Android version. To make sure you're using the right files, open your phone's Settings menu, then scroll down and select "About phone." From here, make a note of the Build number listed at the bottom of the screen. Next, if you're using a Nexus 5X, download the following files to your computer, making sure that the build number shown here matches the one on your phone:Nexus 5X modified boot image (build numbers MDB08I, MDB08L, & MDB08M) TWRP recovery v2.8.7.2 for Nexus 5X (any build number) If you're rooting a Nexus 6P, download the following files instead—but again, make sure the build numbers match up:Nexus 6P modified boot image (build numbers MDB08K, MDB08L, & MDB08M) TWRP recovery v2.8.7.2 for Nexus 6P (any build number) Then, regardless of your phone model or build number, download the SuperSU ZIP and transfer the file over to your phone:SuperSU v2.56 ("systemless" version)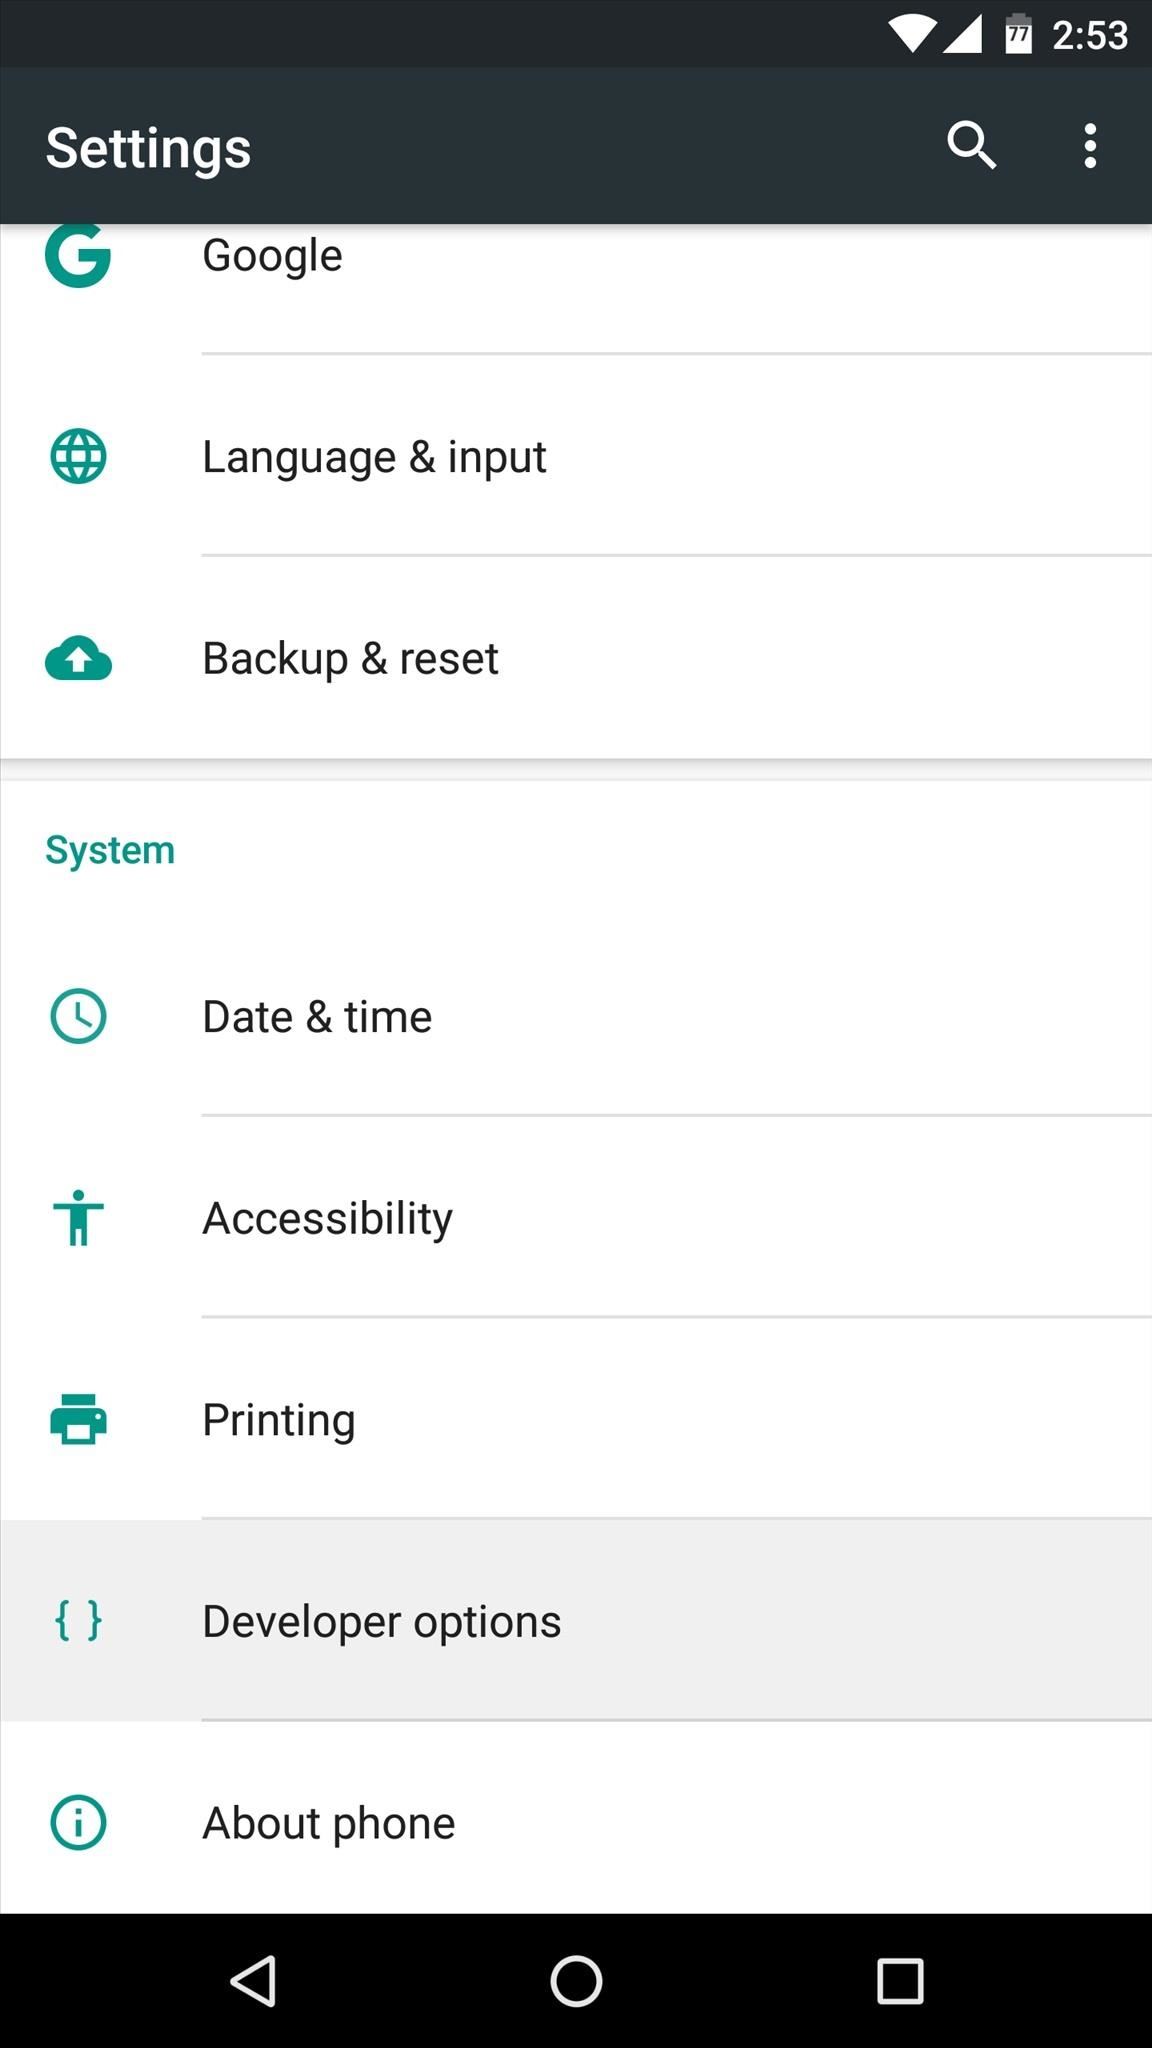
Step 4: Enable OEM Unlocking on Your PhoneFrom here, you'll need to enable Android's hidden "Developer options" menu so that you can then turn on a single option. Check out our full guide to see how to unlock it, if it's not already. In the "Developer options" menu, tap the "OEM unlocking" entry to enable it, then press "OK" when prompted to verify your choice.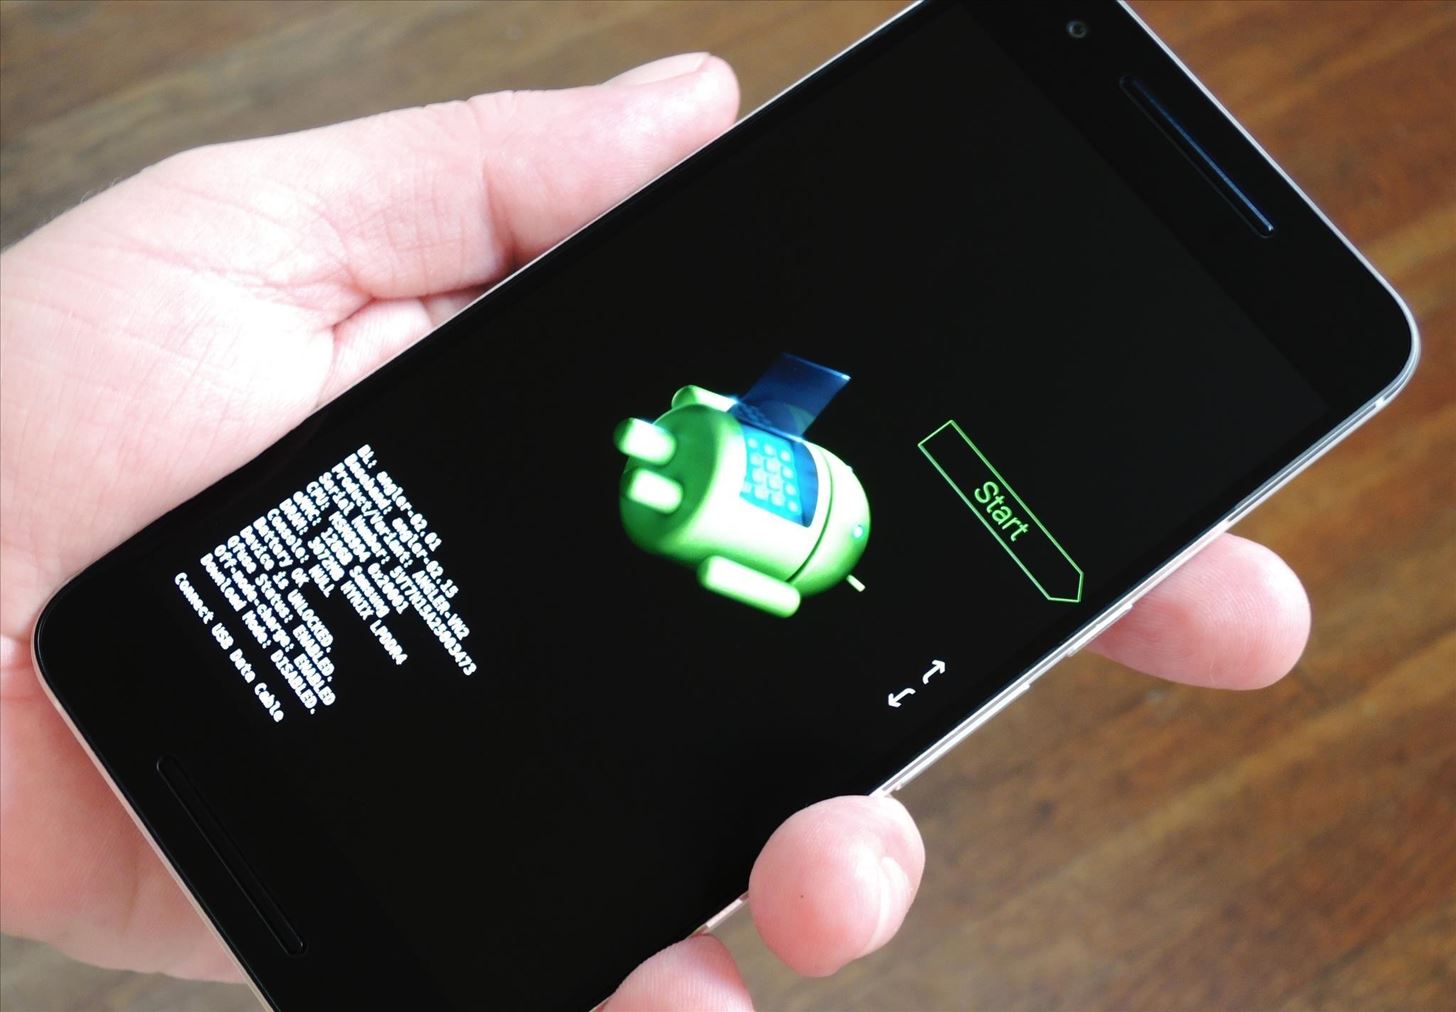
Step 5: Put Your Phone into Bootloader ModeFrom here, you'll need to put your phone into bootloader mode. Start by powering your device completely off. When the screen goes black, press and hold the volume down and power buttons simultaneously. Within a few seconds, you'll see Android's bootloader menu (depicted below). From here, connect your phone to your computer using a USB data cable.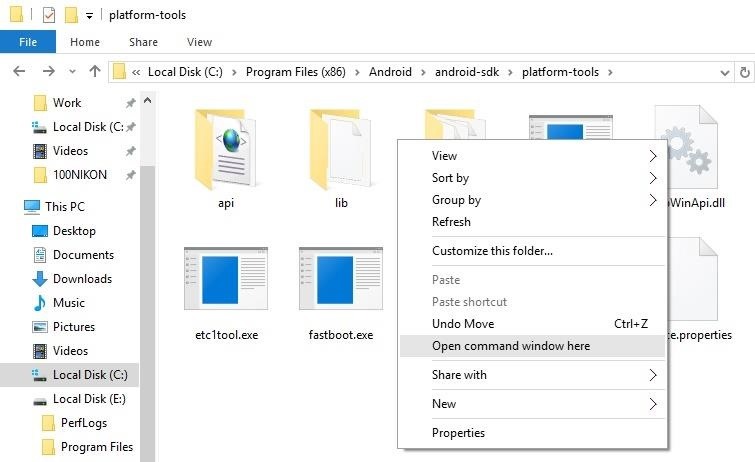
Step 6: Unlock the BootloaderWith the prep work out of the way, you're ready to get down to business. To begin, open a command prompt window, then change directories until you arrive at the /android-sdk/platform-tools/ folder. Windows users can simply open the C:\Program Files (x86)\Android\android-sdk\platform-tools\ folder, then hold down the shift button and right click any empty space, and choose "Open command window here." Next, type in the following command and press enter:fastboot devices If this returns a series of letters and numbers, that means your device is connected properly and you're good to go. If it does not return any characters, there's a problem with your drivers, so revisit Step 2 or see our full troubleshooting guide here. Now you're ready to unlock your device's bootloader, which will allow you to flash images manually. So enter the following command to begin:fastboot flashing unlock At this point, you'll see a menu on your phone asking if you'd like to unlock your bootloader. Use the volume keys to highlight "Yes" on this menu, then press the power button on your phone to confirm your choice. Once you've done that, your phone will automatically wipe all of its data, then reboot into bootloader mode again. When you're done here, leave your phone in bootloader mode and keep the command prompt window open, since we'll be using both again later.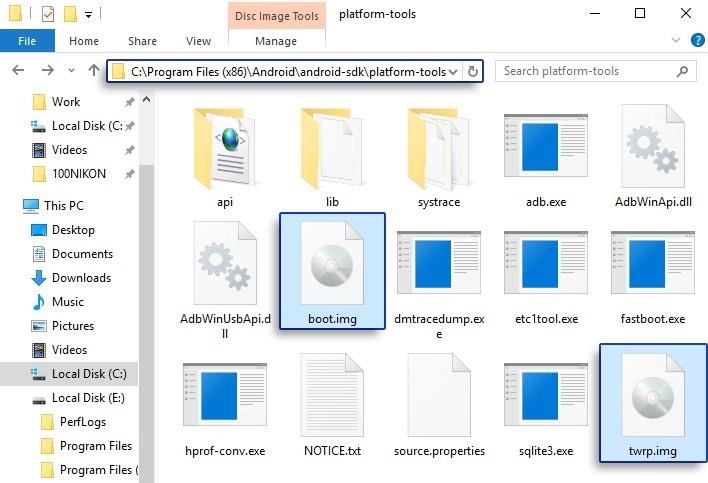
Step 7: Move the Boot Image & TWRP to the Platform-Tools FolderNext, copy the boot.img and twrp.img files that you downloaded in Step 3, then paste them into the /android-sdk/platform-tools folder on your computer. Again, the exact location of this directory will vary depending on your operating system, but Windows users can find it in C:\Program Files (x86)\Android\android-sdk\platform-tools. Note that you may have to provide administrator credentials to paste the files into this folder.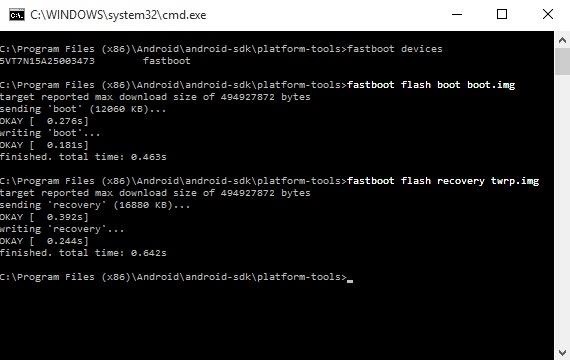
Step 8: Flash the Modfied Boot Image & TWRPNext, switch over to the command prompt window that you opened in Step 6. From here, type in the following commands, pressing enter after each and waiting 30 seconds between commands:fastboot flash boot boot.img fastboot flash recovery twrp.img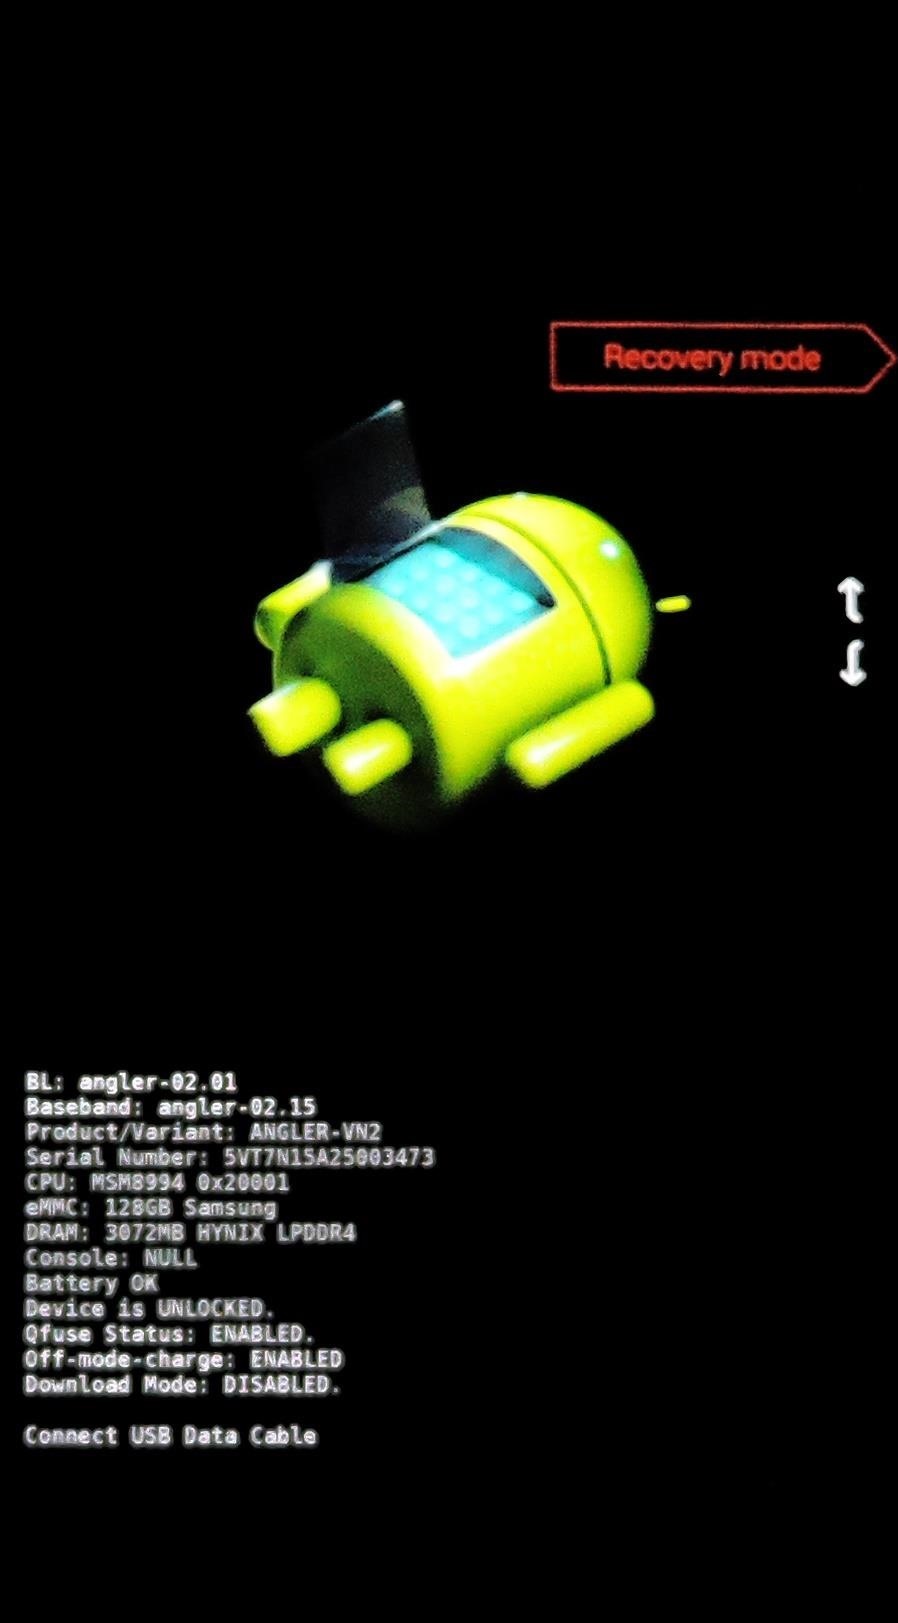
Step 9: Make TWRP Your Permanent RecoveryNext, press your phone's volume down button twice to highlight the "Recovery mode" option on the bootloader menu, then press the power button to select it. From here, your device should boot directly into TWRP. At this point, you'll see a menu asking to make TWRP your permanent recovery, so swipe the slider at the bottom of the screen to do just that.
Step 10: Flash the SuperSU ZIP to RootWhen that process is finished, you'll be taken to TWRP's main menu. Tap the "Install" button here and use the file browser to select the SuperSU-2.56.zip file that you downloaded in Step 3, then swipe the slider at the bottom of the screen to flash the file. When that's finished, tap the "Reboot System" button in the bottom-right corner. At this point, TWRP will say that "Your device does not appear to be rooted." This is because TWRP hasn't been updated to detect the new "Systemless" version of SuperSU, so ignore this message and tap the "Do not install" button.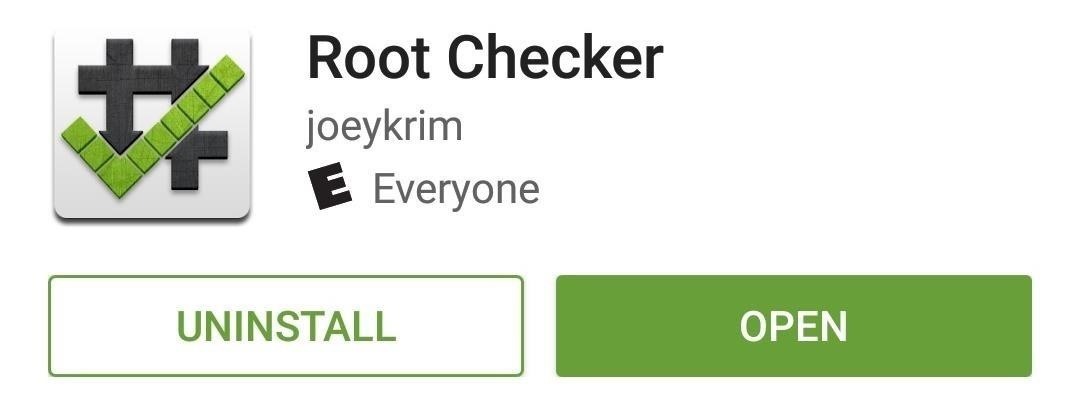
Step 11: Verify RootWhen you get back up, your device should be fully rooted. To verify this, download an app called Root Checker from developer joeykrim.Install Root Checker for free from the Google Play Store Once you've installed the app, simply open it up and tap "Verify Root." From here, tap "Grant" when prompted to give the app Superuser access, and if everything went off without a hitch, you'll see a message saying "Congratulations! Root access is properly installed on this device!"
More Information About Systemless RootThe best part about this new root method is that (so far), Android Pay seems to work without a hitch, and applying OTA updates shouldn't be as difficult as it was with previous root methods. In the future, provided you didn't make any significant changes to the system partition using root access, you should only have to flash the stock boot image with the fastboot flash boot boot.img command to get your device ready for a system update.One downside, though, is that you will lose root access if you perform a factory reset. But getting it back shouldn't be much of an issue, since you'll only have to flash the SuperSU ZIP again in TWRP to re-root.What are your thoughts on this new systemless root method? Let us know in the comment section below, or drop us a line on Android Hacks' Facebook or Twitter, or Gadget Hacks' Facebook, Google+, or Twitter.
Translate anything in Firefox. Translate Man is a translation extension for Firefox that you may use to translate anything on-the-fly. The extension works a bit different to how Chrome's translation feature works, but it uses the Google Translate API for its translations.
Make Sense of Any Text--In Any Language--With gTranslate
Which Stores Accept Apple Pay? The Always Up-to-Date List Apple Pay has been available to use in stores and select apps and websites ever since its first appearance in iOS 8.1. Now that iOS 11 is out, there are currently ten different iPhone models that support Apple Pay functionality without the use of an Apple Watch, and the list of partnered
Apple Pay - Where to Use - Apple
Phosphoric acid was used. ----- Beachfront Celebration - Latinesque by Kevin MacLeod is licensed under a Creative Commons Attribution license (ht
Article: Soldering stainless steels
Supercell's highly anticipated Brawl Stars has soft launched in Canada, with gamers worldwide salivating at the prospect of a full debut around the corner. Unbeknownst to many, this game can be played on your iPhone right now, regardless of where you live. As a testament to this game's potential
FIFA 14 iPhone/iPad - Comeback Kings vs. Bor. Dortmund
Instructions to Unlock Samsung Galaxy S8. Once you get the Samsung Galaxy S8 unlock code on your email, follow the steps below . 1. Insert the non-accepted sim card and power on. 2. Your phone prompts to enter "Sim Network Unlock Pin". 3. Enter the network unlock code and press OK or Enter. 4. Your Samsung Galaxy S8 is now unlocked.
4 Ways to Unlock Samsung S4 Password/PIN/Pattern
How To: Make Trippy EL Wire Headphones That Dance to the Beat of Your Music How To: Prevent the Screen from Waking When Plugging in Your Galaxy S4 to Charge How To: The Galaxy S8's 'Adapt Sound' Feature Makes Your AKG Headphones Actually Sound Premium How To: Music Not Loud Enough? Here's How to Increase the Volume Limits on Your Samsung Galaxy
sai-contributor Archives - November 30 2012 - Business Insider
Steps To disable heads-up notifications on Any Android without root access: Android devices have gone through a big series of evolution to be a great mobile operating system today. We have seen a great increase in the usability of Android, with every new Android version.
Completely Disable Heads Up Notifications in Android Lollipop
If mainstream media has taught us anything, it's that being beautiful can get you ahead in life. The notion isn't necessarily correct, but it's what the general consensus accepts and it seems to hold quite a bit of weight (no pun intended) in the western world.
Perfect Video Selfies by Putting a Teleprompter on Your
iOS 11.3 Beta 5 Released with Mostly Under-the-Hood Improvements Sponsored by: Salehoo -
Leak: Rumored Specs For The Huawei MediaPad M3 8.0 With these just hitting the market in some areas, the spaced-out release schedule means that the first in the MediaPad M3 family is actually
To save cell data and battery life, use "Wi-Fi only" mode. In this mode, when you're not connected to Wi-Fi, Google Maps will only use data from the offline maps that you've downloaded. Before you use this mode, make sure you download offline maps. To turn on this mode, open the Google Maps app Menu next to "Wi-Fi only," turn the switch on.
How To: Download Entire Maps for Offline Use in Google Maps
Go to Google Play Music Settings. Select Add your music. Review, add, or remove folders that upload music to your Google Play Music library. To automatically update your library when you add a song, check the box next to "Keep Google Play up to date when I add new music to these locations."
How to Add Your Own Music to the Google Play Music Cloud
How to Use "Adapt Sound" on the Galaxy S7 and S8 for Better Sound Quality Cameron Summerson @Summerson July 31, 2017, 9:00am EDT Samsung's build of Android Nougat has an incredible new feature that allows users to completely customize their listening experience based completely off their ears.
6 Tips for getting better sounding music out of your Galaxy S
Bloatware remains one of the biggest problems with Android, especially when tied to a carrier. Removing bloatware usually requires you to take extreme measures like rooting. Unfortunately, the Galaxy S10 falls under this annoying umbrella, but there's an easy workaround.Package disablers designed for Samsung phones are all over the Google
The Safest Way to Disable ALL Bloatware on Your Galaxy S10
0 comments:
Post a Comment