How To: Convert Protected M4P Files to MP3 Songs with iMovie and iTunes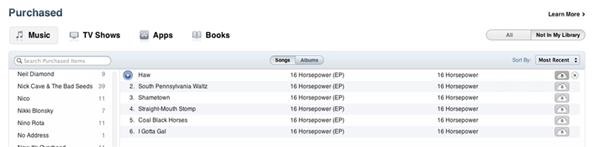
I'm not sure exactly when it happened, but it's awesome that you can now download music from the iTunes Store that's free of DRM (digital rights management) limitations. That was always my biggest problem with buying music from iTunes. Paying a buck for a song that I can only play on Apple devices? Really? That's what finally led me away to other legal music downloading services like eMusic and Amazon.Currently, the iTunes Store offers what they call iTunes Plus song downloads, which are the ones free of DRM. They're also a higher quality AAC format, but the pricing isn't just a buck anymore. It could be either $0.69, $0.99 or $1.29 for a song, depending on how much Apple and the record label feels like charging.Why am I talking about this now?Because I was looking for a no-cost way to convert all of my previously purchased M4P files from iTunes into MP3 format. I finally noticed that Apple allowed upgrading to the new iTunes Plus versions, which gave me a momentary sigh of relief—until I noticed it was not free.With the new iCloud feature, I thought it would be as simple as logging into iTunes and clicking on "Purchased" on the right-side quick links, then clicking on the little cloud icon next to each song (as seen in the below image) to re-download an updated version of the song that was free of digital rights management.But that is not the case. It will just re-download the protected M4P format, not the new AAC one. Then I stumbled upon the option to pay for the upgrade to iTunes Plus for all of my past music purchases, which would cost over a hundred bucks. No thanks.You could pick and choose full albums or individual songs, but still, I'm not paying $0.30 per song when it should be free (in my opinion).Because I love having a very organized iTunes library, I wanted to find another way to turn my M4P song files into either AAC (M4A) or MP3 formats. I didn't care which, I just didn't want any protected files anymore that would make it hard to play on non-Apple devices. And of course, right-clicking on the song and selecting "Create MP3 Version" did not work.I then searched the web for an obvious way to convert the files—using a DRM removal software program that could convert the files to my format of choice. But it's a very spammy world out there when it comes to this. Every program wants you to purchase it for $30 or $40 or whatever. The first twenty applications I found all wanted me to buy them. If I wanted to spend more money, I would have just used Apple's own upgrade option.Then there was the second obvious option—burn the protected songs to a compact disc using iTunes and then re-import them into M4A or MP3. This works fine, except the quality is horrible and the volume level suffers greatly on the songs. Basically, it sucks. Plus, you're still wasting money on blank CDs.So, what's the best way to go about converting your protected M4P files into MP3s?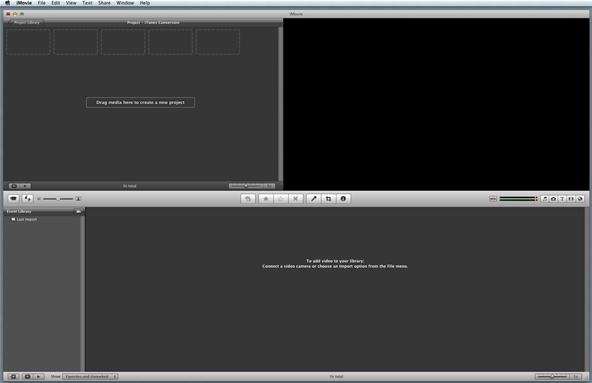
Using iMovie and iTunes for ConversionIf you have iLife '09 still, you can easily convert your M4P files into MP3s using the iMovie '09 application. I heard this method doesn't work with the new iMovie '11, so let us know in the comments whether or not it works in the new iMovie if you've tried it.Step 1 Start a New Project in iMovieObviously, the first thing you need to do is open up iMovie. Open up a new project by hitting Command+N or going to File < New Project. It does not matter what Aspect Ratio you choose, nor which Theme you pick. This has nothing to do with the sound aspect you'll be concentrating on.Step 2 Import an ImageYou can't import any music files until you have something to go with it. After all, this is a video editing program, not music editing. But you don't need a video to start the process. Just import an image into iMovie—any image. Browse your photos in Finder and just drag and drop the picture of your choice into the iMovie project.Step 3 Prepare the ImageNow that the image is there, you'll have to fix it up a bit. For some reason, the Ken Burns effect was automatically applied to my image, and I didn't want that distracting me from my main task, so make sure your image is either cropped or fixed in the window.Just click on (or just hover over) the image in the project window on the left, then click on the little gear symbol in the bottom left of the picture. Click on Cropping, Ken Burns & Rotation.Now, make sure to choose either Crop or Fit, not Ken Burns, then press Done. I chose Crop.Next up is changing the time of the image.Step 4 Change the Image's DurationiMovie automatically sets your image at a 4 second duration, so you'll need to enlarge it to match the song you plan on converting. My example song is 3:16, so I'm going to make the image duration in iMovie that length, too.Again, click on the gear symbol on the image, but this time select Clip Adjustments.The Inspector will pop up, where you can change the 4.0s duration to your liking.I changed mine to 3:16, because that's how long my M4P song is. Click Done.This is what your iMovie project should look like now:Time to move onto the actual music part...Step 5 Add the M4P File to iMovieUse your Mac's Finder to locate the iTunes Music Folder and find the song you want to convert. Just go to Music < iTunes < iTunes Media < Music and then find the artist's name to find the song file. Then, just drag and drop it into the iMovie project.Make sure when you drop it in that you line the file up in the project so that it says "0.0s from clip start" at the bottom (as seen below), otherwise the end of your song might get cut off a bit.You've now got the music file paired with the image.Step 6 Export the File to AIFFNow it's time to export the music as an AIFF file, a high-quality format that you'll later convert to MP3 or M4A in iTunes. Make sure that either the image or song file is highlighted in the iMovie project. It doesn't matter which one.Image selected:Or music selected:Now, go up and hit Share in the top menu, then select the Export using QuickTime... option.Rename your file if you choose to, perhaps the same as the original file, so you can identify it later when you import it into iTunes.Make sure you change the Export option to Sound to AIFF if it's not already selected.Hit the Options button and select your desired Sounds Settings. Then press OK.Hit the Save button.You're sound should be exporting now to your desired location.Okay, we're now done in iMovie. You may now close the application, or keep it open if you have more files to work on.Step 7 Import into iTunesNow that you have the AIFF version of your M4P song, find it in the Finder (wherever you saved it), then open it up in iTunes. Double-clicking on it should do the trick if iTunes is set as your main music player. It should start playing automatically, but you may have to find it. Search for whatever the file name is.PS: You can also drag and drop the file into iTunes.Here you can see the AIFF file located next to its protected M4P counterpart:Now, the best part...Step 8 Convert AIFF to MP3To convert to MP3, just right-click on the file and select Create MP3 Version.Then just wait a few seconds until complete.Now, just use the song information from the MP4 version still in iTunes to fix up the song title, artist name, track number, album cover, album title, etc. Then, you can delete the M4P version and the AIFF version. You no longer need them because you now have the MP3 version!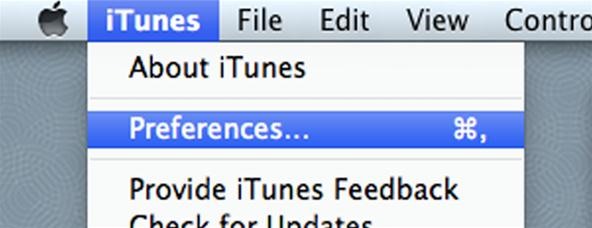
Changing the iTunes EncoderIf you want to change the encoder to something else, you can change it by going to iTunes Preferences:Then clicking on the Import Settings button in the General tab.Then select your encoder of choice. You can pick either AAC (M4A), AIFF (AIF), Apple Lossless Encoder, MP3, or WAV. Press OK when you've picked the one you want and close the Preferences box.And that's it. You've just successfully converted your protected M4P file to an MP3, M4A or whatever. Like I said before, this might only work in iMovie '09, but you can try in iMovie '11 if you want.
Image by iphoneaw
If you have forgotten your Microsoft account password and don't have access to the security information on your account, the account recovery form is a tool that you can use to provide additional information so that Microsoft can make sure that you (and only you) gain access to your account.
Recover your account - Live
Finding the right mix of custom ROM, kernel, and tweaks for my OnePlus One has left me flashing every new release I come across. This has led to many hours going through thread after thread trying to find the latest and best software out there for my phone.
4 Ways the OnePlus 6T Makes Rooting Easy
Unlocking your Android phone's bootloader is the first step to rooting and flashing custom ROMs. And, contrary to popular belief, it's actually fully supported on many phones. Here's how to unlock your bootloader the official way.
How to Unlock the Bootloader & Root Your HTC One M8
The HP App Catalog features thousands of apps ripe for downloading and installation on HP's webOS tablet--the TouchPad. Take a look at this guide to find out how to search for apps using HP's version of the app store.
Solved: app catalog update on touchpad fails to install - HP
A spam Instagram account where people post what they are too afraid to post on the real account
Urban Dictionary: Finstagram
A Colorado nonprofit wants to curb the sale of smartphones to preteens and children. a Denver-area anesthesiologist and father of selling a smartphone to anyone younger than 13 or to
Colorado Voters Will Get A Chance To Prevent Preteens From
Sep 14, 2016 · If your iPhone or iPad has been 'bricked' or stuck with the Apple logo showing, you'll need a computer, iTunes and a cable to fix it. How to fix a broken iOS 10 update that's bricked
How to Fix A Broken iPhone Screen: A DIY Resource And
One of the more annoying things about the Google Voice service, since it's release, has been the inability to use an existing phone number with the service. At sign-up (if you were lucky enough
How to Install and use Google Voice on your Android phone
News: Air Guitar + Kinect Hack = Pure Awesomeness News: Watch Out! Kinect-Based AI System Knows What You're Up To News: The Revolution of the Hacked Kinect, Part 2: Even MBAs Gotta Have One News: The Revolution of the Hacked Kinect, Part 1: Teaching Robots & the Blind to See
The Revolution of the Hacked Kinect, Part 2: Even MBAs Gotta
The cell phone may have replaced the pocket watch, but thanks to some clever mods and hacks, "old-fashioned" time telling is making a comeback. Smart watches that connect to your mobile device cannot only tell you what time it is, but also change the song you're listening to and let you know how many Facebook notifications are waiting for you.
कलर्स में टाइम बताने वाली टोटली गीकी एलईडी पॉकेट वॉच बनाएं
Tap Settings > [your name]. If you use iOS 11, tap Settings > [your name] > iCloud. Tap Share My Location. Tap [family member name] to share with that person. To stop sharing your location, turn off Share My Location. This hides your location from all of your family members and your approved friends.
That is until Android themer Mohit Arora ported the video boot animation functionality from Motorola's latest devices to many other Android gadgets. Rather than using a series of PNG image files to animate your boot sequence, these video boot animations utilize MP4 video files with much higher frame rates.
How to Set a Video as Your Boot Animation - xda-developers
0 comments:
Post a Comment