How To: Extract & Back Up All of Your Text Messages on Android
It always helps to be prepared for the worst. This applies to our phones now more than ever, as we depend on them to be our record keepers for text messages from friends, family, and coworkers. If you ever lose or severely damage your phone, having a backup of your precious texts gives you the peace of mind of knowing that you can always get them back.Thankfully, there's a tried and true app for doing exactly this on any Android device. SMS Backup & Restore can handle all your SMS backup needs, and it's totally free to install. It's also pretty easy to use, and it lets you upload your files directly to Google Drive, OneDrive, Dropbox, or your PC for instant access. Best of all, the app lets you schedule automatic backups for hassle-free saving of vital data.
Step 1: Download SMS Backup & RestoreBefore getting started, you'll first need to either head over to the Google Play Store and install SMS Backup & Restore by developer SyncTech, or simply tap on the link right below.Install SMS Backup & Restore for free from the Google Play Store
Step 2: Open SMS Backup & RestoreNext, open SMS Backup & Restore on your Android, then tap on "Get Started" to proceed. The app will need permission to access data like your contacts and messages for backup purposes, so tap "Allow" on the prompts that appear. Tap on "Set Up a Backup" after granting the app all the necessary permissions.
Step 3: Create a Backup FileIn addition saving text messages, SMS Backup & Restore also gives you the option of backing up call logs for posterity, which is enabled alongside "Messages" by default. You can disable this feature if you'd like — just tap on the toggle next to "Phone calls."Selecting "Advanced Options" gives you more settings to tweak, such as whether or not to include media files and emojis in your backups. We recommend that you disable the "Emojis & special characters" toggle, however, since it might interfere with backup retrieval outside the app. If you want to back up only specific conversations, tap on "Selected conversations only" then hit "0 conversations selected" to go to the selection page. From there, simply tap on the conversations you wish to preserve, then go back to the setup page after making your selections by hitting your back button. Tap on "Next" on the lower-right corner once you've set everything up to your liking.
Step 4: Select a Backup DestinationNow, the app will ask you where you'd like to store copies of your backups, so either tap one or all of the toggles next to "Google Drive," "Dropbox," or "OneDrive," depending on your preference. You can also choose your own device as a backup destination, though it's not recommended since data recovery may become impossible if your device is ever damaged or lost.If you still wish to save your backups to your phone, however, skip down to Step 6 to learn more. That said, once you've enabled any of the cloud-based accounts to send your files to, you'll be prompted to log in on a separate page, so hit the "Log In" button to proceed. If you're device is synced with any or all of the accounts listed in the app, a prompt will automatically appear showing the available accounts that are logged in, so choose the desired account from the list provided. If you want to log into another account not synced with your Android device, tap on "Add account" and enter your login credentials when prompted. Once you're logged in, you have the option of choosing which folder within your cloud account you want to send your backup files to (under the "Folder" section), along with with the ability to automatically delete older backups that pass a certain number of days. Any previous backups performed are available for you to view by simply hitting "Show History."
Step 5: Save Backup FileWith everything set up to your liking, it's time to perform a backup. So tap on "Save" in the lower-right corner of the page, then tap on the toggles directly under "Only Upload" if you want to perform the task while "Over Wi-Fi" or "While Charging." Hit "Next" in the lower-right corner of the screen to proceed. You'll now be taken to a setup page where you can opt to automatically schedule your backups by tapping on the toggle next to "Schedule recurring backups." From there, you can choose between "Daily," "Weekly," and "Hourly" backups, and you can choose the time and day you wish for the process to kick in.If you wish to bypass Doze Mode to ensure that backups are performed even when your phone is in deep sleep, enable the toggle next to "Run scheduled backups at exact time." If you don't want to receive notifications each time a backup is performed, make sure the toggle next to "Disable notifications" is turned on.Instead of waiting on a scheduled backup, you should make a manual backup this first time. So hit "Back Up Now," but keep in mind that you won't need to do this again in the future (backups will happen automatically if you've followed this guide). Once your first backup has completed, you can view its details
Step 6: Save a Backup on Your Device (Optional)If you want back up your text history to your device instead of the cloud, tap on "Your phone" on the setup page, then set the destination folder to either the app's folder (SMSBackupRestore on your SD card or internal storage) or "Your own folder" (any folder of your choosing).It's important to keep track of the destination folder, as you'll need it later on to retrieve your files from an external source. Hit "Next" on the lower-right corner when you've selected a folder, then tap "Yes" on the warning prompt to commence.You'll now be taken to a page to schedule automatic backups and enable other options. For more on this, refer to the bottom half of Step 5.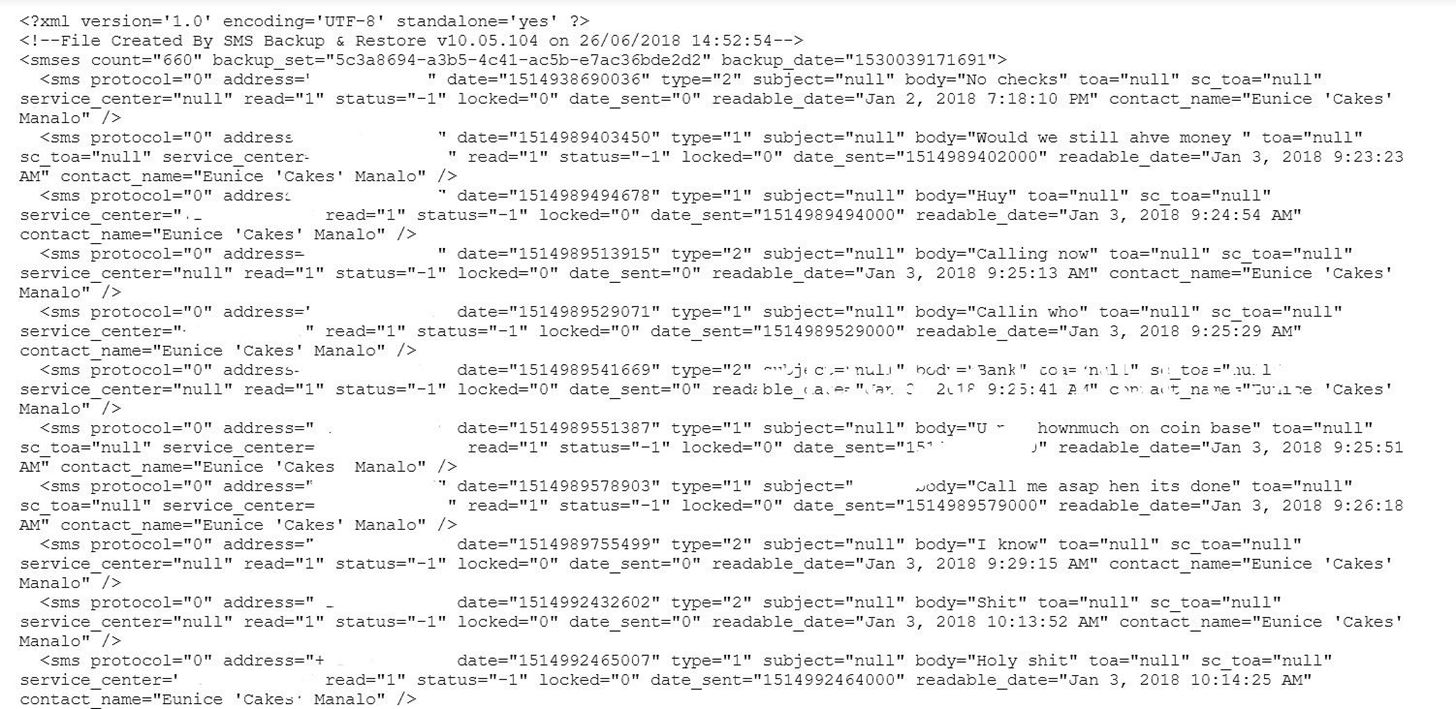
Step 7: View Backup Messages on Your PCWith your SMS texts and phone calls successfully backed up, you'll now be able to view them at any time simply by logging in to the cloud-based account you had the files sent to and clicking on the XML file that starts with "SMS" followed by the date the backup was performed (example: sms-20180626123456.xml). If you opted to store your backups on your device, you'll need to plug your phone to your PC using a USB cable. After doing so, allow your PC to access your device by either granting it permission from the prompt that appears, or set it to "Transfer Files" by tapping on the USB options tab from within your notifications panel. From there, go to your PC and and click on "Open device to view files" from the window that appears to access your Android's files, then navigate to the folder where you sent your backup files. Click on the backup file once you've found it, and it'll open up on a new browser window for you to view in full.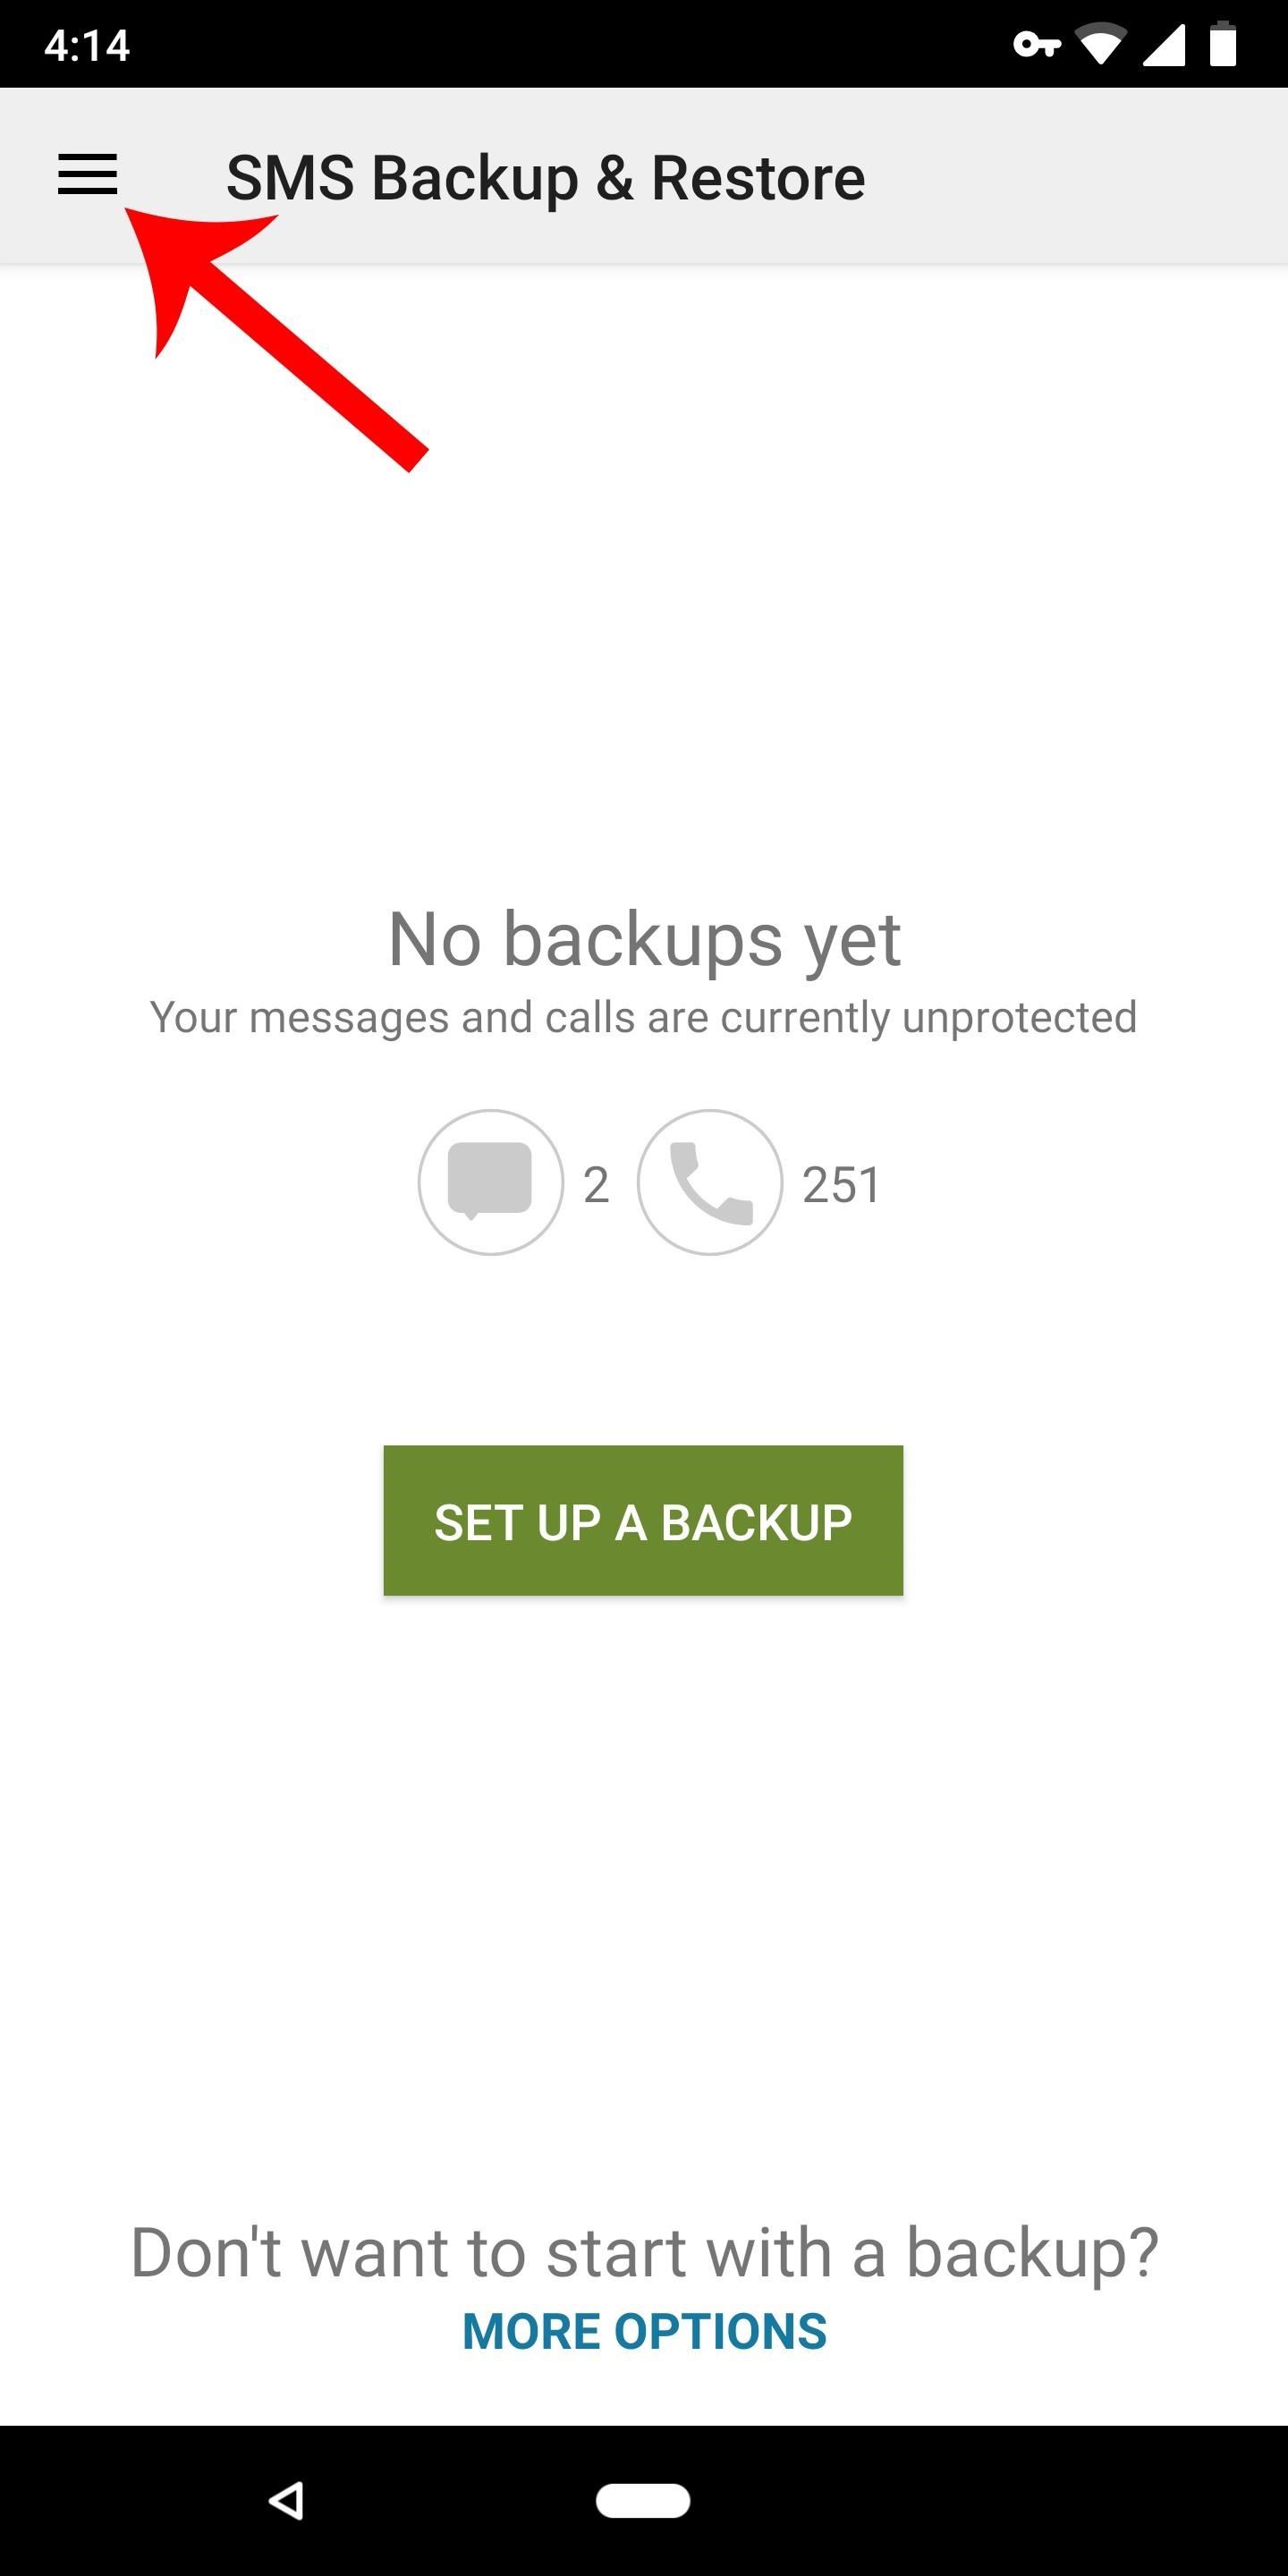
Step 8: Restore Backups on a New Android DeviceNow that your SMS messages and call logs are safely backed up, you're ready for the worst case scenario. If something happens to your current phone or if you just buy a new phone, you can easily restore your messages and call logs.To do so, repeat steps 1 and 2 on the new device, then head to the side navigation menu in SMS Backup & Restore and select "Restore." From there, choose your cloud storage account, log in, then select the backup file you viewed in Step 7. Don't Miss: Android Security 101 — Various Ways to Keep Your Devices & Privacy SafeFollow Gadget Hacks on Facebook, Twitter, YouTube, and Flipboard Follow WonderHowTo on Facebook, Twitter, Pinterest, and Flipboard
Cover image and screenshots by Amboy Manalo/Gadget Hacks
Bloatware remains one of the biggest problems with Android, especially when tied to a carrier. Removing bloatware usually requires you to take extreme measures like rooting. Unfortunately, the Galaxy S10 falls under this annoying umbrella, but there's an easy workaround.Package disablers designed for Samsung phones are all over the Google
The Safest Way to Disable ALL Bloatware on Your Galaxy S10
I decided that I'd try to build my own show as I'm not willing to shell out a huge amount of money for something that I may be able to make on my own. So, I'll show you how I made my very own laser light show that will project either a really cool spider-webby hexagon effect or a crisp triangle effect using a few very common and cheap materials.
Easy Laser Light Show: 12 Steps - instructables.com
Face ID or Touch ID? Apple's new iPhones could upset a lot of people in News. Apple has launched a "The probability that a random person in the population could look at your iPhone X
How to enable Developer options in Android You can unlock the Developer options on any Android smartphone or tablet by locating the Build number in your Settings menu and tapping it multiple times.
Android 7.0 Nougat Developer Options - How To Enable
How Can You Send a Picture With a Text Message on an IPhone 4? Enable MMS options on your iPhone 4 to allow the phone to send photos with text messages. After enabling MMS, open a new message, upload a photo to it and send the message.
45 iPhone Games You Can Play With Friends
How to Bypass Candy Crush Saga's Waiting Period to Get New Lives Levels Immediately Hey guys you all must love to play Candy crush and just love play it ion idol time, likw while traveling or when you are getting bore somewhere.
How to "Hack" Candy Crush Saga - Skip Time Restrictions
If you find yourself switching between Android devices frequently—for instance, your Nexus 6P and a Samsung tablet—you've probably noticed how the button placement can be different. Normally, it's back, then home, then the recent apps button, from left to right.
How to Swap the 'Back' & 'Recent Apps' Buttons on Your Nexus
Sprint has their EVO 4G. AT&T has their Inspire 4G. And now HTC has designed Verizon Wireless's first 4G smartphone—the ThunderBolt. It launched last week with high praises amongst Android devotees, despite its hefty weight, mainly because of the blazing fast speeds Verizon users are experiencing
How To Experience the HTC ThunderBolt—Then Root and Remove
Tips and tricks to get the most out of your Galaxy S9 camera
You can personalize your messages by adding a note in your own handwriting. Your friends and family will see the message animate, as if it were being written in front of them. To send a handwritten note, follow these steps: Open Messages and tap to start a new message. Or go to an existing conversation. If you have an iPhone, turn it sideways.
How to Search iMessages/Text Messages on iPhone
Boost Performance and Reduce Lag-Delays on Your - DroidViews
All the possible ways to make a permanent magnet are listed in Joseph Henry's student notebook, which is kept at Princeton University. Henry, the 18th century American physicist, is known - together with Michael Faraday - as the father of electrical technology, so it's no surprise that one of the methods he describes uses electricity.
How to Make an umbrella parabolic microphone « Hacks, Mods
0 comments:
Post a Comment