How To: Automate Focus, Zoom & Exposure Changes in Filmic Pro for Smoother Pull Operations
There are many reasons to use Filmic Pro if you're a mobile videographer. Chief among them is its automated controls, called "pull-to-point" sliders. These pull-to-point controls not only allow you to manually adjust focus, zoom, exposure, ISO, and shutter speed before and during the action, they also let you set start and end points to automate each function, leaving you free to focus on filming.If you're an experienced camera operator, you already know why these tools are so useful. Pulling zoom, exposure, ISO, shutter speed, and focus gives you the ability to control your image precisely. Better yet, automating the experience means you know exactly what your camera is going to do so you get the effect you want on the first take, versus fumbling around with controls and messing up time and time again.It can be challenging to pay attention to your focus, zoom, ISO, shutter speed, and exposure while worrying about your subjects in front of the camera. With pull-to-point, those worries are a thing of the past, and there's less worrying about multitasking.Don't Miss: How to Choose Resolution & Bitrate of Your Filmic Pro Videos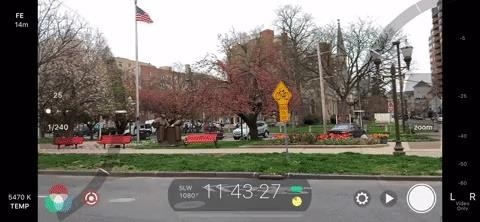
How to Use the Pull-to-Point Slider ControlsBefore we get into automating pull-to-point, we should get ourselves acquainted with the tool in the first place. There are two ways to activate pull-to-point — either long-press on the exposure or focus reticles or tap the pull-to-point icon — the white dot surrounded by three white curves — in the bottom left.A semi-circle wheel, i.e., an arc, will appear on the left side which houses the exposure controls, and the same will appear on the right for zoom and focus. If you tapped the pull-to-point icon, both would show up at the same time. Otherwise, only the one selected will appear. These arc sliders control your chosen function — moving it down moves the control one way, while moving it up does the opposite.For the left arc slider, you can control shutter speed (the fraction on the bottom), ISO (the whole number on top), and exposure which is just the two combined. If you tap either shutter speed or ISO, it will lock that setting in place (the number will become red to indicate it). Moving the arc along its wheel will then adjust for the other option. For instance, if you lock shutter speed, only ISO will change when moving the arc. If neither option is selected, you'll adjust the EV, or exposure value, which changes both shutter speed and ISO at the same time, as mentioned before. You can also quickly change your base ISO by sliding your finger left or right on the dots in between the shutter speed and ISO numbers, where you can select between "Low ISO Bias," "Moderate ISO Bias," or "High ISO Bias." The right arc slider controls both focus and zoom. To choose what the arc slider will control, tap the name of the function inside the arc. For example, select "Focus" to ensure moving the arc along the wheel changes focus. Unlike the left arc slider, this one requires one of these two options to be enabled, so you can't pull both focus and zoom at the same time. What you can do, however, is use both left and right arc sliders at once. Set your functions as noted above, then pull both at the same time. You can change focus and exposure together, zoom and shutter speed, whatever possible combination you can think you'd need.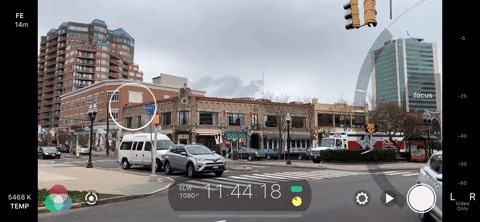
How to Automate the Pull-to-Point Slider ControlsYou can automate any of the functions mentioned above so that Filmic Pro pulls the focus, zoom, ISO, shutter speed, or exposure to your exact start and end points as soon as you initiate it.To begin, open one of the arc sliders, and select your desired function (focus, zoom, ISO, shutter speed, exposure). Next, move the arc along the wheel to a starting position. I'll use focus for an example, so I would move the arc until the focus is how I want to start the scene, whether that's in focus or out of focus.With the arc slider in the right spot, double-tap on the white bar in the center of the arc, the one indicating where the current position is. You'll notice one of the white ticks on the arc moves to your new location. Next, move the arc along the wheel to an endpoint. For me, that would be to either where I want the focus to reach the end of the out-of-focus effect or when the scene is totally in focus.Now, with the arc in the right spot for the endpoint, double-tap the white bar again, and you'll see the other white tick move to this location. Now, move the arc to the start point by sliding it along the wheel there or by tapping on the tick mark. Next, tap the opposite tick mark or on the arrow beside it, and watch as Filmic Pro takes control of the function you've specified. If you need to make any adjustments, repeat the process for your new locations. It works for all of the five features and both arc sliders. Just like pulling freehand, you can use both arc sliders at the same time while automated. You can also animate the effect in the opposite direction by tapping the tick mark, or its arrow, that was supposed to be the beginning of the effect, therefore turning it into the end of the effect. The tick marks each act as both beginning and end markers, depending on which way you want to play it.
Controlling the Speed of the Automated Pull-to-PointYou might notice when automating pull-to-point that it's not doing it at the speed that you would like. Maybe Filmic Pro is focusing way too fast. Perhaps it's changing exposure way too slow. Either way, you'll be happy to know Filmic Pro lets you customize the speed of pull-to-point sliders.To change the speed, swipe right on the exposure tab (not on the white dots though or you'll change the ISO preset) or swipe left on the focus/zoom tab. A slider will appear next to the black bar, which directly controls the speed of the pull-to-point automatic effect. It ranges from speed "1" at the bottom of the display to speed "10" at the top.You can also adjust the speed of the pull-to-point at the same time that it's in motion, which will provide an interesting ramping up or down effect, where the speed increases or decreased during the automation. There is no way to reset the arc sliders back to the defaults, but you can change to a different preset via the cog menu which may have them in a different location. Also, to go back to automatic settings for exposure and focus, hide the arc sliders, then tap the red reticle for either, which indicates you're using the arc sliders.This article was produced during Gadget Hacks' special coverage on smartphone-based video creator tips for filming and editing. Check out the whole Videography series.Don't Miss: How to Change FPS in Filmic Pro to Shoot & Play Frame Rates from Standard Cinematic to Super Slow-MoFollow Gadget Hacks on Pinterest, Reddit, Twitter, YouTube, and Flipboard Sign up for Gadget Hacks' daily newsletter or weekly Android and iOS updates Follow WonderHowTo on Facebook, Twitter, Pinterest, and Flipboard
Cover image and GIFs by Jake Peterson/Gadget Hacks
How to Make a Super Secret Batman-Style Bust Switch for Your
How To: Enable the Hidden Debug Options for Select Google Apps on Your Nexus 5 News: Christmas Is Coming Early! Android 7.1 Beta Is Hitting Nexus Devices This Month How To: Disable Double-Tap to Wake While Making Calls on Your Nexus 6 How To: Hide Your Nexus 7's Soft Keys to Maximize Usable Screen Space
How to Enable Developer Options on Your Nexus « Nexus 7
Disable Notification Preview on iOS 10 Lock Screen. At first, open Settings and go to Notifications. Here, you can find all the apps those can have push notification feature. Now, you have to select a particular app that you want to disable notification preview for. You will get two different options including Show on Lock Screen and Show Previews.
How to Hide Text Previews for Every App Notification on iOS
If you're using a smartphone, tablet, or computer, you can make it discoverable, too. On an iPhone, iPad, or Android device, just open the Bluetooth settings screen — your device will be discoverable as long as you have that screen open. On a Mac, just open the Bluetooth settings screen.
How to Use a Bluetooth Device: 6 Steps (with Pictures
The most common polariser is the Circular Polariser or CPL, and if you have an autofocus camera (I would be surprised if you didn't) then the circular polarizer is for you. It is comprised of
How to Fix Stuck or Dead Pixels on Almost Any Screen
How To: Remove Bloatware on Your LG V30 — No Root Needed How To: Remove Bloatware Apps on Your Galaxy Note 3 (AT&T Variant Only) How To: Push Samsung Push Out of Your Phone, & Life, Right Now How To: The Safest Way to Disable All Bloatware on Your Galaxy S9 or S9+ How To: Remove Blinkfeed from Your HTC One for a Stock Feel Without Rooting
Prova l'HTC ThunderBolt-Then Root e rimuovi le sue app
Unlisted videos and playlists can be seen and shared by anyone with the link.Your unlisted videos won't appear to others who visit the "Videos" tab of your channel page and shouldn't show up in YouTube's search results unless someone adds your unlisted video to a public playlist.
YouTube - Create video from mp3 and a single image online
tovid.io
Please make sure that the image is licensed allowing you to re-use it. Give credits in the video description when requested. Resulting YouTube video will have a 720p HD resolution. Should you ask "why not 1080p?", the answer is that it gains no improvement of the audio quality.
Video Maker | Create Irresistible Videos Online
How to Completely Close Out Running Applications on Your
From the menu bar at the top of your computer screen or at the top of the iTunes window, choose Account > View My Account. You might need to sign in with your Apple ID. On the Account Information page, scroll to the Settings section. To the right of Subscriptions, click Manage. To the right of your Apple Music subscription, click Edit.
How to set up and manage Apple Pay on the Mac | iMore
You may come across your favorite eBook in PDF format, in which case you will need a PDF to eBook converter which allows you to convert and read unlimited eBooks. For your convenience, this article shows you an easy way to convert PDF to eBook compatible file types. Best PDF to eBook Converter
Website Recommendations: Where can I download free e-books in
How to Transfer Photos from Android phone to PC over WiFi. If you'd like to transfer photos from your Android phone to your PC over Wifi, we recommend Droid Transfer. The app will also copy other data from your Android phone, including music, contacts and messages. Here's how to transfer photos from phone to laptop or PC over WiFi:
Get Samsung Gallery - Microsoft Store
DPI aka PPI is the density of the screen. dip is a unit for specifying size of UI stuff in a screen-density independent way. If you mean to ask if PPI value you got is the DPi value, yes. - Aswin Kumar Jul 20 '12 at 11:06
Support different pixel densities | Android Developers
Google finally added a built-in scanner called the "application verification service" to its Play Store and Android operating system in November. The only problem is that a report published by computer science professor Xuxian Jiang found that the scanner only detects a little over 15% of malicious apps.
Chrysaor Malware Found on Android Devices—Here's What You
Save your documents to OneDrive and you can access them on any of your devices wherever you are. But, there's even more you can do than just access them on the go. With Office 2013 on your computer you can open, work on, share, and collaborate on your Word, Excel, and other Office documents from OneDrive.
How to Access & Control Your Computer Remotely with Your Nexus 5
How to Use Iphone Text Messaging. The Apple iPhone has a multitude of features. Other than making and receiving phone calls, you can surf the web, send an email or type a text message. Learn about the ways that you can send and receive text messages on your iPhone.
How to View and Get iPhone Messages on PC/Mac Computer
0 comments:
Post a Comment